Chapter 5. Internet based measurement of the servo motor
- 5.1. Aim of the measurement
- 5.2. Introduction
- 5.3. System overview
- 5.4. Presentation tools for measurement
- 5.5. General guidelines to experiments
- 5.6. Using the PCI-1720 D/A card – Motion control/ Exercise 1.
- 5.7. Using the real-time clock with PCI 1720 D/A card – Motion control/ Exercise 2.
- 5.8. Using the PCI-1784 Counter card – Motion control/ Exercise 3.
-
- 5.8.1. Initializing the PCI-1784 card by the function of DRV_DeviceOpen (see Exercise 1.)
- 5.8.2. Reset counter values on PCI-1784 card by the function: DRV_CounterReset
- 5.8.3. Start counting operation on PCI-1784 card by the function of DRV_CounterEventStart
- 5.8.4. Read counter values on PCI-1784 card by the function of DRV_CounterEventRead
- 5.8.5. Sample program of counter operations on PCI-1784 card
- 5.9. Open Loop Control measurement – Motion control/ Exercise 4.
- 5.10. Closed Loop Control Measurements – Motion control/ Exercise 5.
5.1. Aim of the measurement
The user can learn from this measurement the control of a servo drive and robot by a computer. First the user gets acquainted with the communication between the computer and the servo drive as the important component of a mobile robot. Next, the embedded system of a mobile robot is studied (There is a separate Manual for robot experiment).
We will use a Digital-Analogue converter to send information from the computer to the servo drive since the reference signals are analogue voltage signals in most servos drives. The movement of the motor is measured by an encoder, which sends impulse train to the computer. A counter counts the impulses of the encoder and the computer can read the value of the encoder informing it on the position of the motor. The speed of the motor is calculated from the actual and the previous position information. This method results in a very noisy speed signal. The measurement uses a Discrete time filter to reduce this measurement noise. The user can learn the way of writing and tuning the PI controller for this simple servo drive.
The user does not need to be expert in computer programming, but she/he has to know the basics. The user will write some very simple program in C language and Visual Basic. Examples are shown and it is believed that the user can carry out this measurement even if it will be her/his first C or visual basic program.
The experiments are accessible on the following website:http://dind.mogi.bme.hu/experiment/
5.2. Introduction
To meet the competitiveness and environmental challenges in the manufacturing industry, automation and robotization is one of the most important trends i.e. turning the manual work power from tiring repetitive tasks into complex tasks where knowledge and human skills are required. This is both due to the increasing complexity level of products and the focus on improved working environment within EU. However, advanced robotic systems require advanced knowledge within many classical fields of engineering and surely in the small and medium size enterprises (SME), where all of these areas of expertises probably missing from the knowledge of the employees. Turning now to the problems of the advanced courses offered by universities, one of them is the different backgrounds of the attendees. In case of an advanced motion control course, one solution can be that the professor can refer to the internet for the necessary background. In this note new technology and new learning methods are combined. The interactive multimedia applications (animations, simulations, remote tasks) combined with the Web-based laboratory tests result in a Personal Learning Environment available all day around and all year around.
The DC motors have a special historical role in the field of industrial electronics since all industrial servo drives used DC motors in the past and the first microprocessor controlled drive [1] also applied DC motor. Even if they have several drawbacks they are used in recent applications [2] , [6] The main advantage of a DC servo motor drive is that it is simple from the point of view of control. Before the advent of micro controllers they were the only solutions for servo drive systems. It is easy to adopt various control methods for a DC servo system. It explains why some of the newly proposed control methods are frequently applied first for a DC servo system. On the other hand, there is a trend to control all kind of servo drives (field oriented induction motor drives [7] and brushless drives [8]) like a DC servo drive. PID controller is still the most common controller method in the industrial applications [9]. The other popular method is the sliding mode control that was introduced in the late 1970’s [10] but it is used recently in high-performance motion control systems [11]. In recent applications, the sliding mode control is combined with different soft computing methods [12], [13]. Sliding mode control of variable structure systems has a special role in the field of robust control. On one hand, the exact description of sliding mode needs advanced mathematics, which was established by [3], [4] in the early sixties. On the other hand, it is quite easy to implement in most engineering systems, only simple relay is necessary in most cases. To use the manual and perform the exercises the reader does not need to be familiar with most of the references listed.
5.3. System overview
Web based experiments play an important role in next generation of laboratories. The experiments can be operated around the clock. Access is provided whenever it is needed after booking. This manual deals with the control of DC servo motor and all necessary theoretical and experimental knowledge is included or referred to.
Following the manual’s instructions the users will acquire experience in PC based control of electrical systems, and in this specific case, in DC servo drive (Figure 5-1.).
In order to control the DC motor connected to PC, the following system components performing basic functions are needed:
-
A card generating analogue output signals to turn on/off the drive and generate the reference signal (e.g. D/A card).
-
A card receiving input encoder signal forwarding it to the PC (e.g. A/D card or counter card).
-
A real-time clock that can schedule signal sampling or task execution.
The users will start learning from the basics of programming of above mentioned cards through implementing modern control theories in real circumstances.
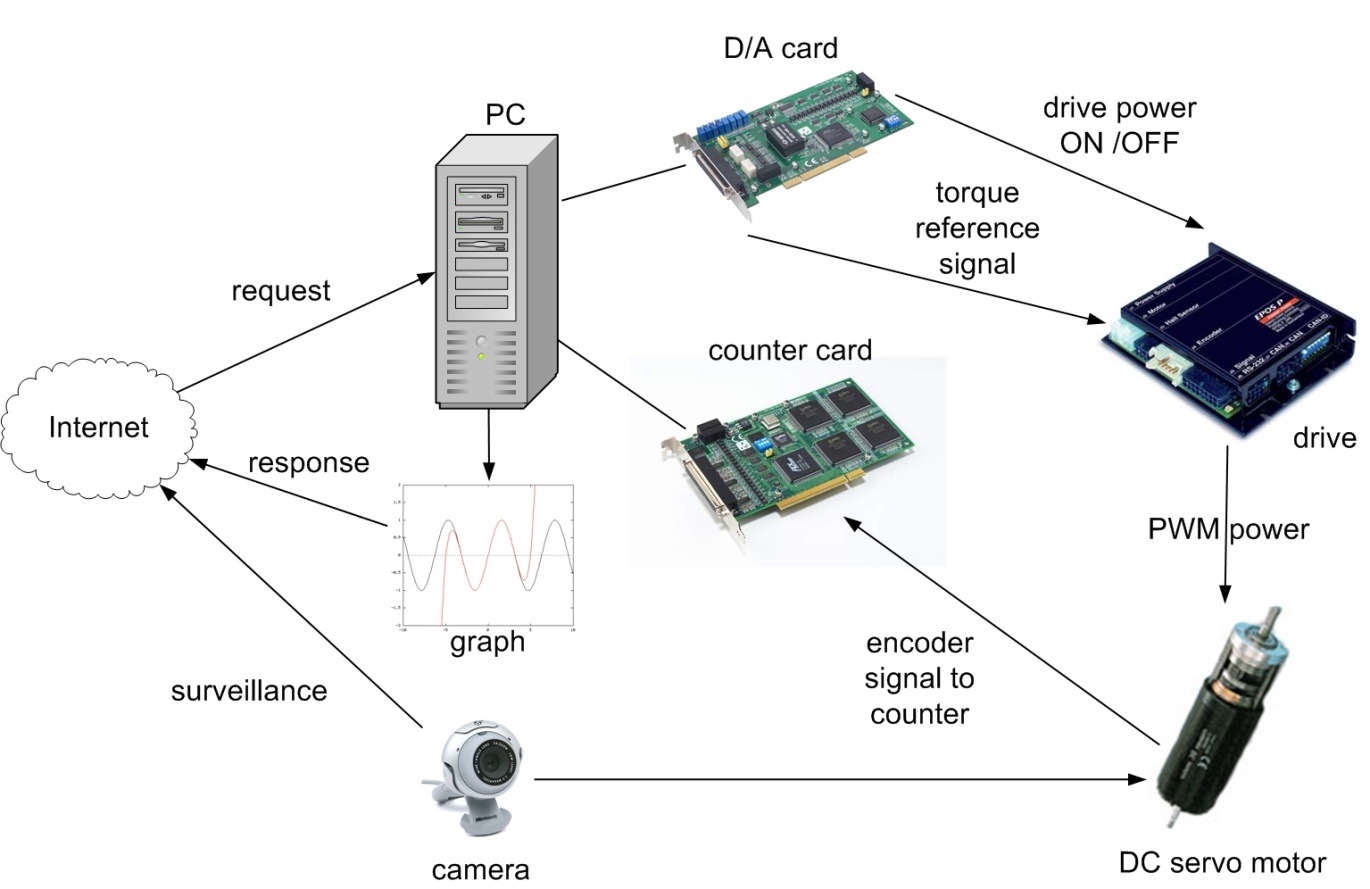
The key system components applied here are the following:
-
Industrial Siemens PC with Pentium 4, 2.8 GHz processor.
-
Advantec PCI-1720 D/A output card performing function 1.
-
Advantec PCI-1784 counter input card performing function 2.
-
Servo drive including:
-
Servoamplifier;
-
Maxon A-max 26(110961) DC motor;
-
Maxon Digital Encoder HP HEDL 5540;
-
Maxon Planetary Gearhead GP 26(110395).
-
WebCam for visualising the laboratory setup on the monitor.
-
MATLAB program.
The experiments are accessible on the following website:http://dind.mogi.bme.hu/experiment/
5.4. Presentation tools for measurement
Motor data from Maxon motor homepage: http://test.maxonmotor.com/docsx/Download/catalog_2007/Pdf/07_256-257-258_e.pdf
1) Assigned power rating 11 W
2) Nominal voltage 15.0 Volt
3) No load speed 7930 rpm
4) Stall torque 73.9 mNm
5) Speed / torque gradient 110 rpm/mNm
6) No load current 43 mA
7) Starting current 4190 mA
8) Terminal resistance 3.58 Ohm
9) Max. permissible speed10400 rpm
10) Max. continuous current1070 mA
11) Max. continuous torque18.9 mNm
12) Max. power output at
nominal voltage 14500 mW
13) Max. efficiency 78 %
14) Torque constant 17.6 mNm/A
15) Speed constant 541 rpm/V
16) Mechanical time constant 15 ms
17) Rotor inertia 12.6 gcm2
18) Terminal inductance 0.33 mH
19) Thermal resistance
housing-ambient 13 K/W
20) Thermal resistance
rotor-housing 3.2 K/W
21) Thermal time
constant winding 12 s
22) Axial play 0.1 - 0.2 mm
23) Max. ball bearing loads:
axial (dynamic) 5.0 N
radial (5 mm from flange) 20.5 N
24) Press-fit force (static) 75 N
(static, shaft supported) 1200 N
25) Max. sleeve bearing loads:
axial (dynamic) 1.7 N
radial (5 mm from flange) 5.5 N
26) Press-fit force (static)80 N
(static, shaft supported) 1200 N
27) Radial play ball bearing 0.025 mm
28) Radial play sleeve bearing 0.012 mm
29) Ambient temperature range -30/+85°C
30) Max. rotor temperature +125°C
31) Number of commutator segments 13
32) Weight of motor 119 g

5.4.1. Interface Box
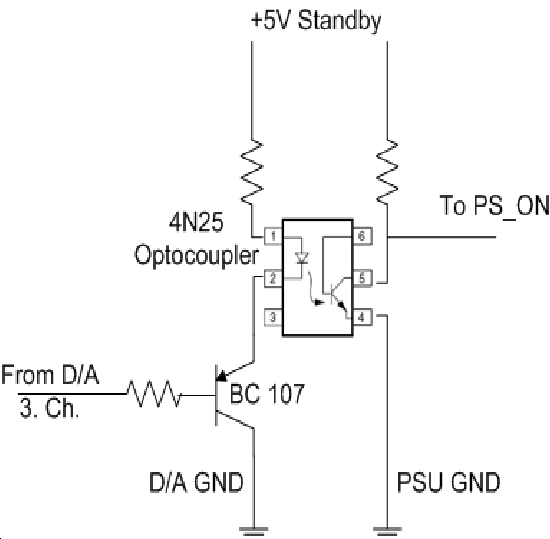
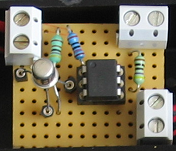
The interface box’s main task is to make connection between the control box, sensor and the PC. Another task is the switching of the power supply unit. It is common, that the personal computers are running 24 hours a day. But an experimental set up can not be turned on all day long because of security reasons. The idea of using the personal computer as a remote controllable switch, come up to expectations. It is common that a computer is able to turn on itself remotely ( by Wake On LAN). This function is provided by the Power Supply Unit (PSU), which provides a standby voltage (+5V, max 0.5 mA) even if it is turned off. A normal PSU can also provide voltage for an experimental DC servo motor and controller. The PCI-1720 D/A output cards’ 3. channel is used for turning on and off the PSU in the interface box, which supplies the servo amplifier with energy. Turning on is made by holding the voltage on +2V, and turning off is with voltage of 0V. The standby voltage is used to keep the PSU off and as the PS ON pin is low active, a small circuit is needed to make the voltage change. The circuit diagram and a picture of the real circuit is shown in Figure 5-3. and Figure 5-4.
5.4.2. Parameters of the Planetary Gearhead
-
Planetary Geared straight teeth
-
Output shaft steel
-
Bearing at output ball bearings
-
Radial play, 5 mm
-
from flange max. 0.02 mm
-
Axial play 0.1 mm
-
Max. perm. radial load,
-
12.5 mm from flange 40 N
-
Max. permissible axial load 20 N
-
Max. permissible force
-
for press fits 20 N
-
Recommended input speed < 5000 rpm
-
Recommended
-
temperature range -30/+90°C
-
Number of stages 1 2 3
-
Average backlash no load<20‘<35‘<50‘
Gearhead data:
-
1 Reduction 33:1
-
2 Reduction absolute 299/9
-
3 Number of stages 2
-
4 Max. continuous torque
at gear output0.7 Nm
-
5 Intermittently permissible torque
at gear output 2.0 Nm
-
6 Sense of rotation, drive to output =
-
7 Max. efficiency 85 %
-
8 Weight 107 g
-
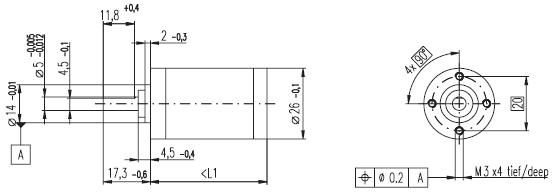
9 Gearhead length L1 36.7 mm
Technical data:
-
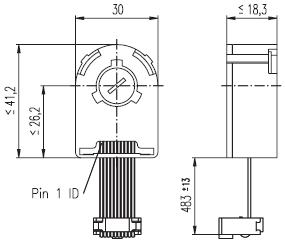
Supply voltage 5 V ± 10 %
-
Output signal EIA RS 422
-
Drivers used:DS26LS31
-
No. of channels 2+1 Index
-
Counts per turn500
-
Phase shift
-
Φ (nominal) 90°e
-
Logic state width s min. 45°e
-
Signal rise time180 ns
-
(typical at CL=25 pF, RL=2.7 kΩ, 25°C)
-
Signal fall time40 ns
-
(typical at CL=25 pF, RL = 2.7 kΩ, 25°C)
-
Index pulse width
-
(nominal) Option 90°e
-
Operating temperature range 0 / +70°C
-
Moment of inertia
-
of code wheel ≤ 0.6 gcm2
-
Max. acceleration 250 000 rad s-2
-
Output current per channel min. -1 mA,
-
max. 20 mA
-
Max. operating frequency 100 kHz
5.5. General guidelines to experiments
Every exercise can be reached through the homepage of the experiments address. The order of the exercises is defined in such a way that helps the users to build them on the results of the previous exercises. The layout of the homepage can be seen in Figure 5-7.
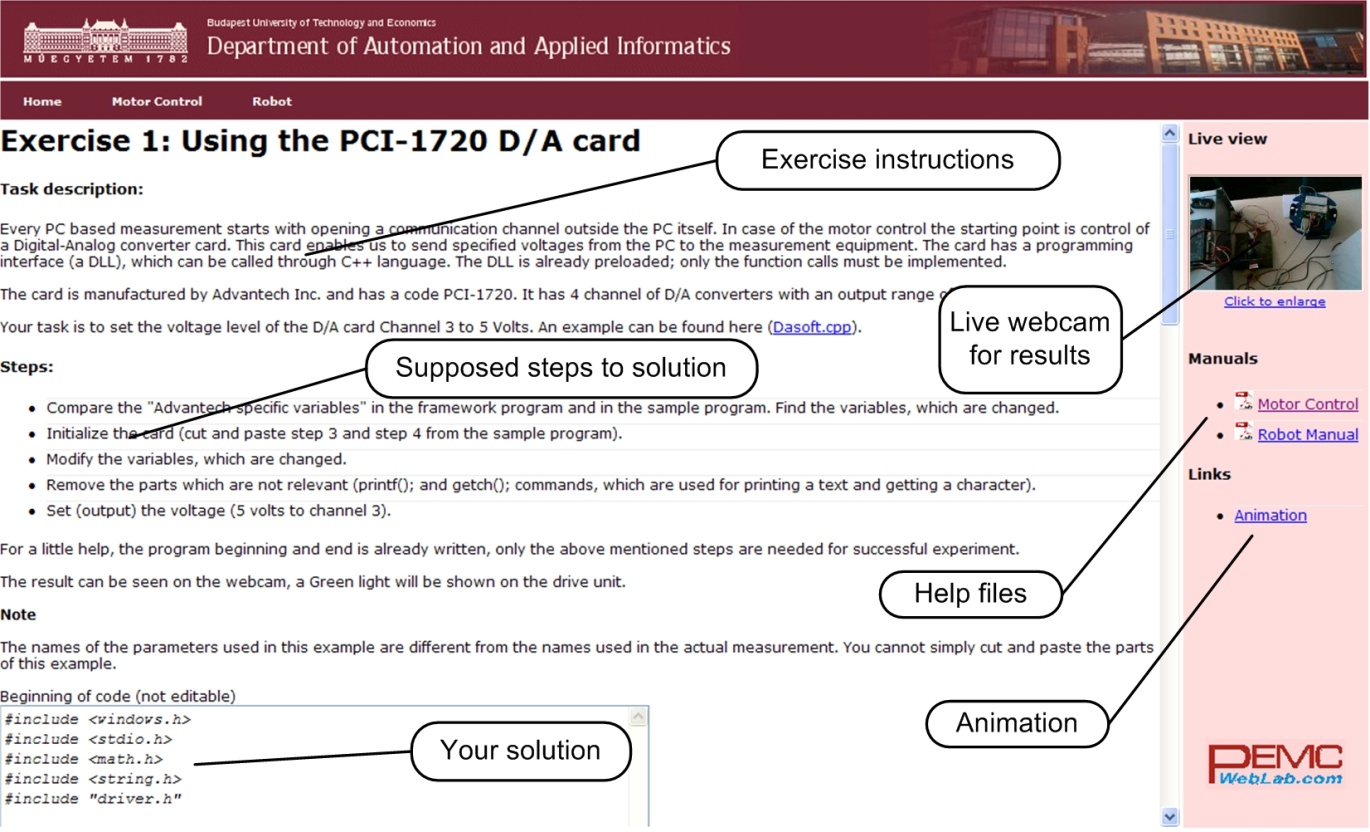
To reach an exercise, select it from the menu or the dropdown list as seen in Figure 5-8.

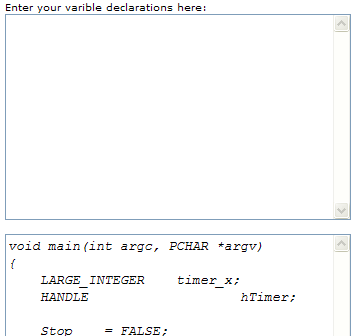
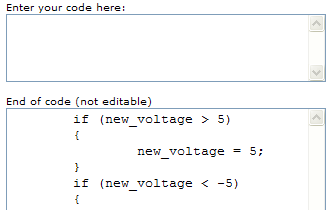
After reading the exercise instructions and the available additional help files, sources; the program controlling the system components can be written in the specified fields. The programming language is C++ and the variables and code can be inserted in two different input fields as seen in Figure 5-9.
|
|
|
Figure 5-9. Solution input
To execute the experiment click the “Upload” button, placed at the bottom of the homepage.
If the solution is correct, the result of the exercise can be downloaded / observed.
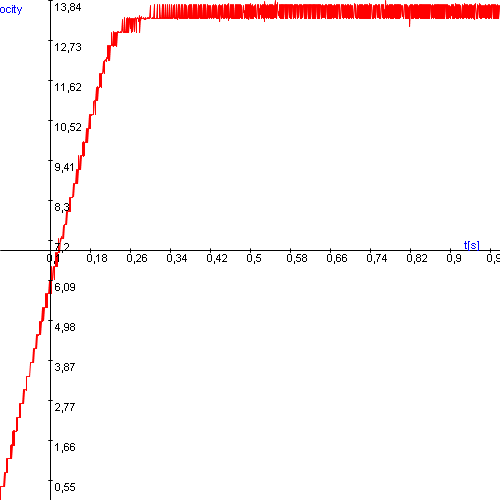
Every exercise has different results. They can be observed and evaluated on the PC monitor by:
-
Webcam (e.g. video picture);
-
MATLAB files (e.g. position, voltage, velocity, time);
-
Graphs (e.g. position, voltage, velocity versus time).
Example of output is shown in
Experiment is complete!
Click to show time-time graph![]()
Click to show time-position graph![]()
Click to hide time-velocity graph![]()
Click to show time-torque graph![]() Select item to download:
Select item to download:
5.6. Using the PCI-1720 D/A card – Motion control/ Exercise 1.
Every PC based measurement starts with opening a communication channel outside the PC itself. In case of the motor control the starting point is the control of a Digital-Analog converter card. This card enables us to send specified voltages from the PC to the measured system. The card has a programming interface (a DLL, Dynamic-Link Library), which can be called through C++ language. The DLL is already preloaded; only the function calls must be implemented.
The card is manufactured by Advantech Inc. and has a code PCI-1720. It has 4 output channels of D/A converters with an output range of -5V to +5V. Your task is to set the output voltage level of the D/A card channel 3 to 5 Volts. Actually, this 5 Volts enables the operation of the servo drive.
Steps needed:
-
Compare the “Advantech specific variables” in the framework program and in the sample program. Find the variables, which are changed.
-
Initialize the card (cut and paste step 3 and step 4 from the sample program).
-
Modify the variables, which are changed.
-
Remove the parts which are not relevant (printf(); and getch(); commands, which are used for printing a text and getting a character).
-
Set (output) the voltage (5 volts to channel 3).
5.6.1. Initializing the PCI-1720 card by the function: DRV_DeviceOpen
Function call: status = DRV_DeviceOpen(DeviceNum, DriverHandle)
Purpose: Retrieves parameters pertaining to operation of the device from the Registry or Configuration file, and allocate memory to store it for quick reference. This function must be called before any other functions.
|
Name |
Direction |
Type |
Range |
Description |
|
DeviceNum |
Input |
unsigned long |
default |
device number |
|
DriverHandle |
Output |
Long pointer |
default |
a pointer to the configuration data for the device |
Return:
-
SUCCESS if successful.
-
MemoryAllocateFailed if memory allocation failure.
-
ConfigDataLost if retrieving configuration data failure.
-
CreateFileFailed if low level driver has an opening failure.
Notes:
-
All subsequent functions perform the desired I/O operations based on configuration data retrieved by the DriverHandle parameter.
-
After the I/O operations, user has to call DRV_DeviceClose to release the memory allocated by DRV_DeviceOpen.
5.6.2. Setting the voltage level on PCI 1720 card by the function: DRV_AOVoltageOut
Function call: status = DRV_AOVoltageOut(DriverHandle, lpAOVoltageOut)
Purpose: Accepts a floating-point voltage value, scales it to the proper binary number, and writes that number to an analog output channel to change the output voltage.
|
Name |
Direction |
Type |
Range |
Description |
|
DriverHandle |
Input |
long |
default |
assigned by DRV_DeviceOpen |
|
lpAOVoltageOut |
Input/Output |
long pointer to PT_AOVoltageOut |
default |
the storage address for chan and OutputValue |
Return:
-
SUCCESS if successful.
-
InvalidDriverHandle if DriverHandle = NULL.
-
InvalidChan if input channel is out of range.
-
BoardIDNotSupported if this function is not supported for this Device.
5.6.3. Sample program of initializing and setting the voltage level on PCI-1720 card
NOTE
The names of the parameters used in this example are different from the names used in the actual measurement. You cannot simply cut and paste the parts of this example.
/*
***************************************************************************
 * Program        : DASOFT.CPP                       .                    *
 * Description    : Demo program for analog output function               *
 * Boards Supp.   : PCL-818 series/818HG/1800/816/812PG/711B/726/727/728, *
 *                  PCI-1710/1720, MIC-2728, ADAM-4021/5024               *
 * APIs used : DRV_DeviceOpen,DRV_DeviceClose, DRV_GetErrorMessage        *
 *                  DRV_AOVoltageOut                                      *
 * Revision       : 1.00                                                  *
 * Date           : 7/8/1999                   Advantech Co., Ltd.        *
 **************************************************************************
*/
#include <windows.h>
#include <windef.h>
#include <stdio.h>
#include <conio.h>
#include "..\..\..\include\driver.h"
/******************************
 * Local function declaration *
 ******************************/
void ErrorHandler(DWORD dwErrCde);
void ErrorStop(long*, DWORD);
void main()
{
    DWORD  dwErrCde;
    ULONG  lDevNum;
    long   lDriverHandle;
    USHORT usChan;
float  fOutValue;
PT_AOVoltageOut tAOVoltageOut;
    //Step 1: Display hardware and software settings for running this example
    printf("Before running this example, please\n");
    printf("use the device installation utility to add the device.\n");
    //Step 2: Input parameters
    printf("\nPlease input parameters:");
    printf("\nDevice Number (check the device installation utility): ");
    scanf("%d", &lDevNum);
    printf("\nOutput Channel: ");
    scanf("%d", &usChan);
    printf("\nOutput Value: ");
    scanf("%f", &fOutValue);

    //Step 3: Open device
    dwErrCde = DRV_DeviceOpen(lDevNum, &lDriverHandle);
    if (dwErrCde != SUCCESS)
    {
        ErrorHandler(dwErrCde);
        printf("Program terminated!\n");
        printf("Press any key to exit....");
        getch();
        exit(1);
    }
    // Step 4: Output value to the specified channel
    tAOVoltageOut.chan = usChan;
    tAOVoltageOut.OutputValue = fOutValue;
    dwErrCde = DRV_AOVoltageOut(lDriverHandle, &tAOVoltageOut);
    if (dwErrCde != SUCCESS)
    {
        ErrorStop(&lDriverHandle, dwErrCde);
        printf("Press any key to exit....");
        getch();
        return;
    }
    // Step 5: Display ouptut data
    printf("\nOutput data = %f\n", fOutValue);
    // Step 6: Close device
    dwErrCde = DRV_DeviceClose(&lDriverHandle);
    printf("\nPress any key to exit....");
    getch();
}//main
/**********************************************************************
 * Function: ErrorHandler
 *           Show the error message for the corresponding error code
 * input:    dwErrCde, IN, Error code
 * return:   none
 **********************************************************************/
void ErrorHandler(DWORD dwErrCde)
{
    char szErrMsg[180];
    DRV_GetErrorMessage(dwErrCde, szErrMsg);
    printf("\nError(%d): %s\n", dwErrCde & 0xffff, szErrMsg);
}//ErrorHandler
/**********************************************************************
 * Function:   ErrorStop
 *             Release all resource and terminate program if error occurs
 * Paramaters: pDrvHandle, IN/OUT, pointer to Driver handle
 *             dwErrCde, IN, Error code.
 * return:     none
 **********************************************************************/
void ErrorStop(long *pDrvHandle, DWORD dwErrCde)
{
    //Error message
    ErrorHandler(dwErrCde);
    printf("Program terminated!\n");

    //Close device
    DRV_DeviceClose(pDrvHandle);
}//ErrorStop
5.7. Using the real-time clock with PCI 1720 D/A card – Motion control/ Exercise 2.
The second important function in a PC based measurement is sampling. For this reason we need a real-time clock that can initiate the sampling at a specified moment and by a given frequency. There are several real-time operation systems including a real-time clock for synchronization. The multitask type Windows Operation System does not support the real time applications but the Real-Time eXtension (RTX) for Control of Windows solves that problem. You can read a description on it below but you do not need to understand its operation fully for this measurement. The application of the real-time clock is tested in Exercise 2.
A clock is ticking in the program given in the exercise (every millisecond) and your task is to output a sinusoidal voltage time function (3 Volts amplitude and 1 Hz frequency) by the PCI 1720 D/A card. .
You have to define the relationship of the sampling time and the sine wave. The sampling time starts from 0 and can be reached through the CurrentTime variable given in the program. This time variable can be reached through the variable time_array[tickCount] and the value is given in 100 nanosecond units.
Steps needed:
-
Study the given program framework
-
Write in the missing codes
-
Declare the parameters and variables
-
Out=Amplitude * sin (Angular Frequency *time) (Note it is not a C code and you have to read time by the TimerHandler function)
5.7.1. How real-time is achieved without real-time operating system?
(Just to read)
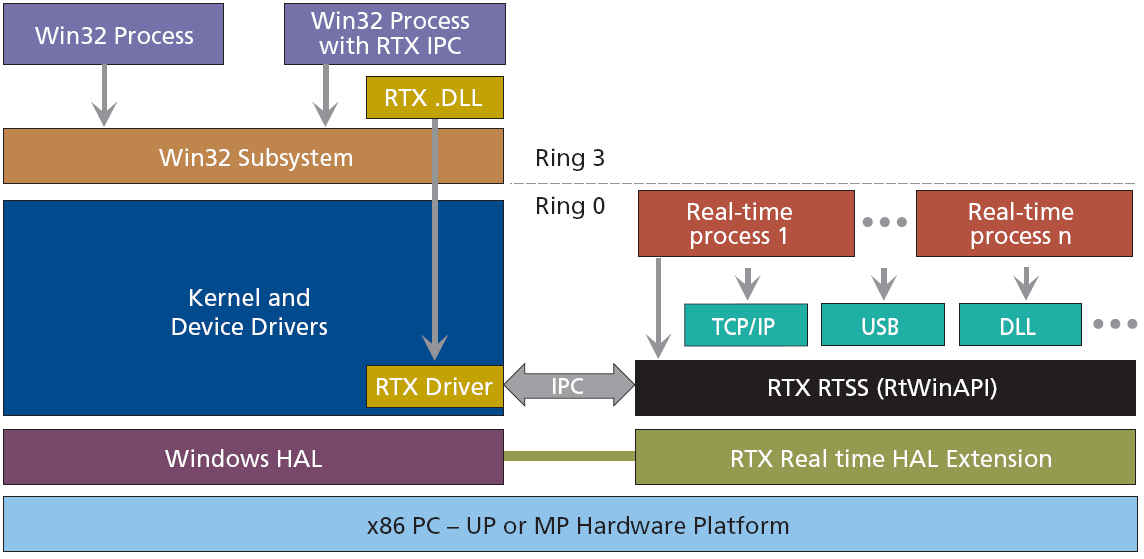
Real-Time eXtension (RTX) for Control of Windows is specifically designed as an optimized extension to the Windows operating system. It is not a Real-Time Operating System (RTOS) ported to Windows. RTX provides precise control of IRQs (Interrupt ReQuests), I/O, and memory to ensure that specified tasks are executed with proper priority and 100% reliability. By operating in Ring 0, RTX ensures the highest performance and requires minimal configuration, supporting sustained interrupt rates of 30 KHz with an average IST latency of less than one microsecond. RTX is a true Windows extension, utilizing all the standard Windows conventions, including the APIs, memory management, SRIs, mutexes, and semaphores familiar to Windows developers. An RTX application can take full advantage of the memory-protection mechanisms offered by Windows and the Intel architecture in Ring 3. Once the developer completes debugging and ensures that memory pointers and arrays are valid, the RTX application can immediately be recompiled to run in Ring 0 for optimum performance. The key is in architecture, which can be seen in Fig. 6.
RTX architecture is a true extension in that it does not encapsulate Windows and does not interfere with, or modify any of the Windows infrastructure. By maintaining this separation, the RTX real-time sub-system (RTSS) ensures that RTX-based applications survive Windows crashes or “blue screens.” The RTX RTSS kernel is designed around a high-speed scheduler that utilizes both preemptive and round-robin algorithms. RTX supports up to 1,000 independent processes, with each process supporting unlimited threads. Fine-grained control over applications is assured with 256 levels of assignable thread priority. The scheduler guarantees that critical thread context switches and yields to threads of higher priority occur in the 500 nanosecond to less than two microsecond range. To facilitate data communications between RTX processes and Win32 applications, RTX utilizes a high-throughput messaging and synchronization IPC mechanism. Using a shared memory model, IPC can transfer large amounts of data with no performance degradation. Precise execution of events is critical in a real-time system. To support this precision, RTX provides three clocks on which to base event timers. Clock resolution, depending on the clock used, can be precise within 0.001 nanosecond, without any drift.
5.8. Using the PCI-1784 Counter card – Motion control/ Exercise 3.
The counter is used to read the signal of the encoder and convert it to a numeric representation. The counter value is read by TimerHandler function, which is executed in every tick of the real-time clock.
Your task is to read the counter value of channel 3 on the PCI-1784 card.
Steps needed:
-
Initialize the card.
-
Reset counter values.
-
Start counting operation.
-
Read counter value in the beginning.
-
Read counter value at every tick of real-time clock.
5.8.1. Initializing the PCI-1784 card by the function of DRV_DeviceOpen (see Exercise 1.)
Function call: status = DRV_DeviceOpen(DeviceNum, DriverHandle)
Purpose: Retrieves parameters pertaining to the operation of the device from the Registry or configuration file, and allocate memory to store it for quick reference. This function must be called before any other functions.
|
Name |
Direction |
Type |
Range |
Description |
|
DeviceNum |
Input |
unsigned long |
Default |
device number |
|
DriverHandle |
Output |
long pointer |
default |
a pointer to the configuration data for the device |
Return:
-
SUCCESS if successful.
-
MemoryAllocateFailed if memory allocation failure.
-
ConfigDataLost if retrieving configuration data failure.
-
CreateFileFailed if low level driver has an opening failure.
Notes:
-
All subsequent functions perform the desired I/O operations based on configuration data retrieved by the DriverHandle parameter.
-
After the I/O operations, user has to call DRV_DeviceClose to release the memory allocated by DRV_DeviceOpen.
5.8.2. Reset counter values on PCI-1784 card by the function: DRV_CounterReset
Function call: status = DRV_CounterReset(DriverHandle, counter)
Purpose: Turns off the specified counter operation.
|
Name |
Direction |
Type |
Range |
Description |
|
DriverHandle |
Input |
long |
Default |
assigned by DRV_DeviceOpen |
|
counter |
Input |
long |
Default |
counter channel |
Return:
-
SUCCESS if successful.
-
InvalidDriverHandle if DriverHandle = NULL.
-
BoardIDNotSupported if the function is not supported for this device.
-
InvalidChannel if the port number is out of range.
5.8.3. Start counting operation on PCI-1784 card by the function of DRV_CounterEventStart
Function call: status = DRV_CounterEventStart(DriverHandle, lpCounterEventStart)
Purpose: Configures the specified counter for an event-counting operation and starts the counter.
|
Name |
Direction |
Type |
Range |
Description |
|
DriverHandle |
Input |
long |
default |
assigned by DRV_DeviceOpen |
|
LpCounterEventStart |
Input/Output |
long pointer to PT_CounterEventStart |
default |
the storage address for countger and GateMode |
Return:
-
SUCCESS if successful.
-
InvalidDriverHandle if DriverHandle = NULL.
-
BoardIDNotSupported if the function is not supported for this device.
-
InvalidChannel if the port number is out of range.
Operations:
-
The programming method depends on the counter/timer chip on the board. There are two kinds of chips used in A/D Card: Intel 8254 and AMD Am9513A. For Am9513A, counter channels 0-9 can all function as a rising edge event counter. Connect your external event generator to the clock input of the desired counter. If hardware ”gating”, in which the counter may be started by a separate external hardware input, is desired, choose a gating type and use an external device to trigger the gate input of the counter.
-
Both of the above counter/timer chips are 16-bits. However, the function supports a 32-bit counter, i.e. it counts up 232. It will check if the counter is overflowing and converts it to 32-bits by calculation.
-
Intel 8254 hardware counter needs 2 cycle time to reload counter setting, so counter program has to wait for 2 external trigger (cycle time) to read correct counter value. At the first time of calling ”DRV_CounterEventStart”, Intel 8254 hardware uses default value to initialize its counter setting. This initialization will take about 2 external trigger (cycle time) to finish. If ”DRV_CounterEventRead” is called before initialization is finished, then the program will get incorrect value. So, you have to delay 2 external trigger (cycle time) in program before calling ”DRV_CounterEventRead” to make sure the return value is correct. The delay time is dependent of the time of external trigger.
5.8.4. Read counter values on PCI-1784 card by the function of DRV_CounterEventRead
Function call: status = DRV_CounterEventRead(DriverHandle, lpCounterEventRead)
Purpose: Reads the current counter total without disturbing the counting process and returns the count and overflow conditions.
|
Name |
Direction |
Type |
Range |
Description |
|
DriverHandle |
Input |
long |
default |
assigned by DRV_DeviceOpen |
|
lpCounterEventRead |
Input/Output |
long pointer to PT_CounterEventRead |
default |
the storage address for counter, overflow and count |
Return:
-
SUCCESS if successful.
-
InvalidDriverHandle if DriverHandle = NULL.
-
BoardIDNotSupported if the function is not supported for this device.
-
InvalidChannel if the port number is out of range.
5.8.5. Sample program of counter operations on PCI-1784 card
NOTE
The names of the parameters used in this example are different from the names used in the actual measurement. You cannot simply cut and paste the parts of this example.
/*
***************************************************************************
 * Program        : COUNTER.CPP                                           *
 * Description    : Demo program for counter function                     *
 * Boards Supp.   :                                                       *
 * APIs used      : DRV_DeviceOpen,DRV_DeviceClose, DRV_GetErrorMessage,  *
 * DRV_CounterReset, DRV_CounterEventStart, DRV_CounterEventRead          *
 * Revision       : 1.00                                                  *
 * Date           : 7/8/1999                   Advantech Co., Ltd.        *
***************************************************************************
#include <windows.h>
#include <windef.h>
#include <stdio.h>
#include <conio.h>
#include "..\..\..\..\include\driver.h"
/******************************
 * Local function declaration *
 ******************************/
void ErrorHandler(DWORD dwErrCde);
void ErrorStop(long*, DWORD);
void main()
{
    DWORD  dwErrCde;
    ULONG  lDevNum;
    long   lDriverHandle;
    USHORT wChannel = 0;
USHORT wOverflow = 0;         // counter over 32 bit flag
ULONG  dwReading = 0;
PT_CounterEventStart tCounterEventStart;
    PT_CounterEventRead  tCounterEventRead;
    //Step 1: Display hardware and software settings for running this example
    printf("Before running this example, please\n");
    printf("use the device installation utility to add the device.\n");
    //Step 2: Input parameters
    printf("\nPlease input parameters:");
    printf("\nDevice Number (check the device installation utility): ");
    scanf("%d", &lDevNum);
    printf("\nInput Channel: ");
    scanf("\n%d", &wChannel);
    //Step 3: Open device
    dwErrCde = DRV_DeviceOpen(lDevNum, &lDriverHandle);
    if (dwErrCde != SUCCESS)
    {
        ErrorHandler(dwErrCde);
        printf("Program terminated!\n");
        printf("Press any key to exit....");
        getch();
        exit(1);
    }
    // Step 4: Reset counter by DRV_CounterReset
dwErrCde = DRV_CounterReset(lDriverHandle, wChannel);
    if (dwErrCde != SUCCESS)
    {
        ErrorHandler(dwErrCde);
        printf("Program terminated!\n");
        printf("Press any key to exit....");
        getch();
        exit(1);
    }
    // Step 5: Start counting operation by DRV_CounterEventStart
tCounterEventStart.counter = wChannel;
    dwErrCde = DRV_CounterEventStart(lDriverHandle, &tCounterEventStart);
    if (dwErrCde != SUCCESS)
    {
        ErrorHandler(dwErrCde);
        printf("Program terminated!\n");
        printf("Press any key to exit....");
        getch();
        exit(1);
    }
    // Step 6: Read counter values by DRV_CounterEventRead in while loop
    //         and display counter value, exit when pressing any key
tCounterEventRead.counter = wChannel;
    tCounterEventRead.overflow = &wOverflow;
    tCounterEventRead.count = &dwReading;
    while( !kbhit() )
    {
       dwErrCde = DRV_CounterEventRead(lDriverHandle, &tCounterEventRead);
       if (dwErrCde != SUCCESS)
       {
          ErrorStop(&lDriverHandle, dwErrCde);
          return;
       }
       printf("\nCounter value = %lu", dwReading);
       Sleep(1000);
    }
    // Step 7: Stop counter by DRV_CounterReset
dwErrCde = DRV_CounterReset(lDriverHandle, wChannel);
    if (dwErrCde != SUCCESS)
    {
        ErrorHandler(dwErrCde);
        printf("Program terminated!\n");
        printf("Press any key to exit....");
        getch();
        exit(1);
    }
    // Step 8: Close device
    dwErrCde = DRV_DeviceClose(&lDriverHandle);
    getch();
    printf("\nPress any key to exit....");
    getch();
}//main
/**********************************************************************
 * Function: ErrorHandler
 *           Show the error message for the corresponding error code
 * input:    dwErrCde, IN, Error code
 * return:   none
 **********************************************************************/
void ErrorHandler(DWORD dwErrCde)
{
    char szErrMsg[180];
    DRV_GetErrorMessage(dwErrCde, szErrMsg);
    printf("\nError(%d): %s\n", dwErrCde & 0xffff, szErrMsg);
}//ErrorHandler
/**********************************************************************
 * Function:   ErrorStop
 *             Release all resource and terminate program if error occurs
 * Paramaters: pDrvHandle, IN/OUT, pointer to Driver handle
 *             dwErrCde, IN, Error code.
 * return:     none
 **********************************************************************/
void ErrorStop(long *pDrvHandle, DWORD dwErrCde)
{
    //Error message
    ErrorHandler(dwErrCde);
    printf("Program terminated!\n");

    //Close device
    DRV_DeviceClose(pDrvHandle);
    printf("Press any key to exit....");
    getch();
    exit(1);
}//ErrorStop
5.9. Open Loop Control measurement – Motion control/ Exercise 4.
After the introduction of the PC based measurement system, it is time for writing the first controller for a DC motor.
5.9.1. Theoretical background for DC servomotor
The theoretical background is overviewed in substantial number of animated slides. Additional explanation can be accessed from the animated slides. This is a compressed repetition of the DC motor module of a PC based material entitled “INETELE Interactive and Unified E-Based Education and Training for Electrical Engineering”.
5.9.2. Construction and equivalent circuit of DC servomotor
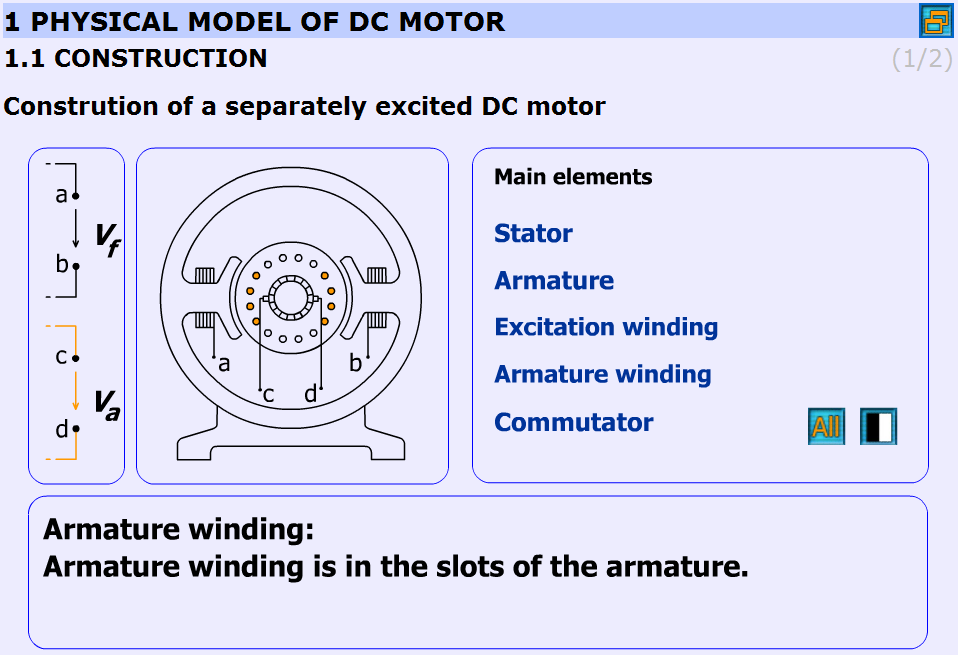
The construction of the DC-servo motor:
-
Stator: Stator is the stationary part of the machine.
-
Armature: Armature is the rotating part of the machine.
-
Excitation winding: Excitation winding is placed around the poles in the stator.
-
Armature winding: Armature winding is in the slots of the armature.
-
Commutator: The commutator periodically reverses the current. It consists of rotating segmented copper contacts and stationary carbon brushes.
Equivalent circuit
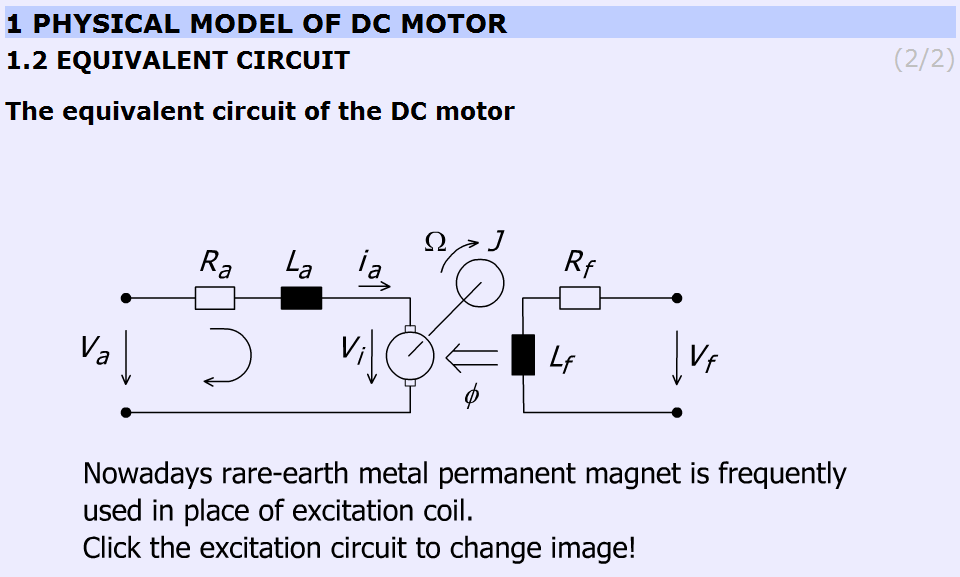
Parameters and variables of the DC servomotor:
Ra – Armature resistance [ohm];
La – Armature inductance [henry];
J – Inertia [kgm2];
va – Armature voltage [volt];
vi – Back e.m.f. generated in the armature winding [volt];
ia – Armature current [ampere];
Ω – Shaft speed of the motor [rad/s];
Vf, Rf, Lf, Ф are pertaining to the excitation circuit.
This subchapter focuses on the excitation of the DC motor. In most cases in the small DC motors permanent magnet is applied.
5.9.3. Mathematical model
This chapter explains the mathematical model of the DC motor. Three main parts can be found here:
-
Time-domain equations
-
Frequency-domain equations
-
Transfer functions
Time-domain equations
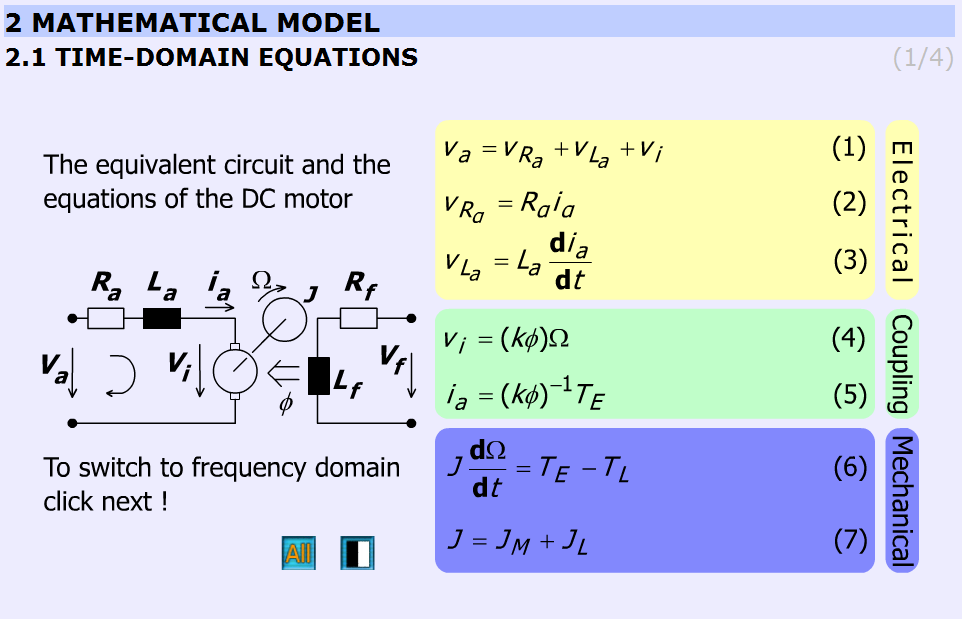
This chapter presents the time-domain equations. These slides are focused on the following equations:
where  is the electric torque of the motor
|
|
( 5.6 ) |
where  is the torque of the load
|
|
( 5.7 ) |
where  is the load inertia.
The explanation can be found in the “INETELE Interactive and Unified E-Based Education and Training for Electrical Engineering”. It can be reached from the slide shown in Figure 5-15. It contains the bridge to the next frame declining with the frequency-domain equations.
Frequency-domain equations
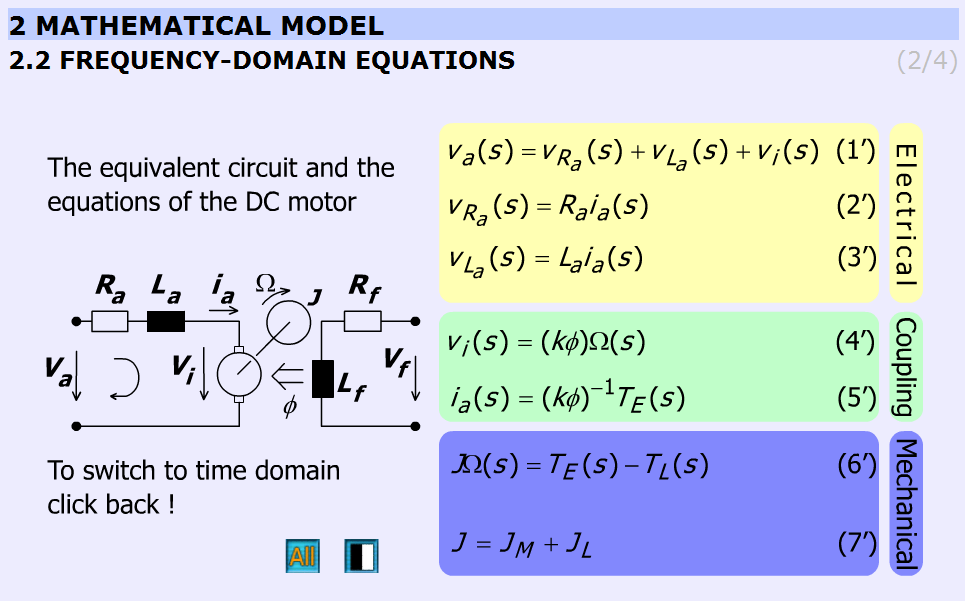
This chapter presents the frequency-domain equations. The variables are complex quantities (s = jω).
|
|
(5.10) |
|
|
(5.11) |
|
|
(5.12) |
|
|
(5.13) |
|
|
(5.14) |
Transfer functions
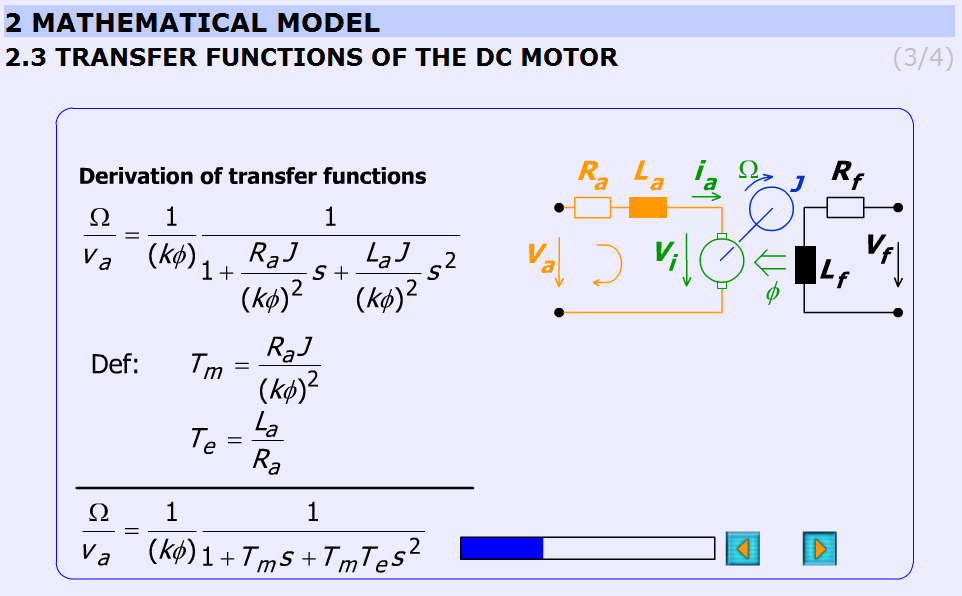
This subchapter explains the derivation of the transfer function of the DC motor in a detailed form step-by-step.
The initial equations are given in the previous chapter (Frequency-domain equations) and the final equations are:
The electrical, Te and mechanical, Tm time constants are:
The animation contains explanation images as well. Images are changing according to the derivation stages. The progress bar graphically shows the percentage of the derivation completed.
The derivation of the time constants can be seen in Figure 5-17.
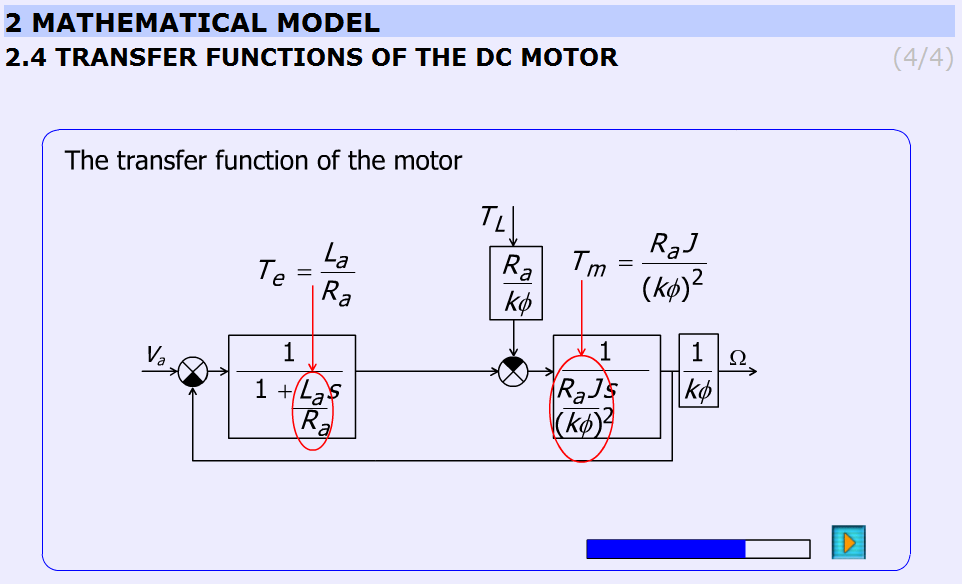
5.9.4. Analysis of the model
State space representation
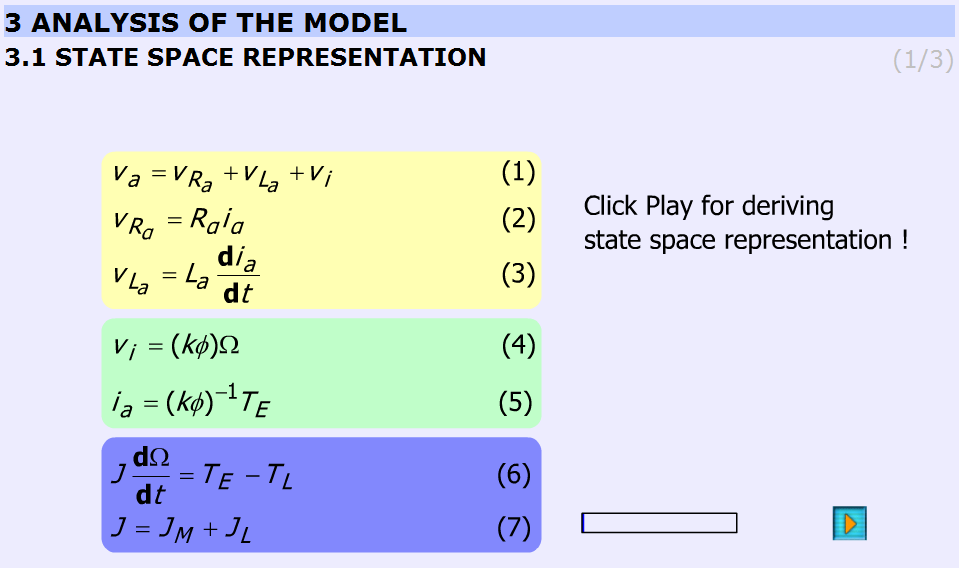
This subchapter derives the state space representation in the same way as in the subchapter Transfer functions of the DC motor was done. The initial conditions are the same as in the subchapter Time-domain equations. The result is the following:
|
|
(5.19) |
Using vectors and matrices the state space representation:
|
|
(5.20) |
where x is the state vector.
Steady state
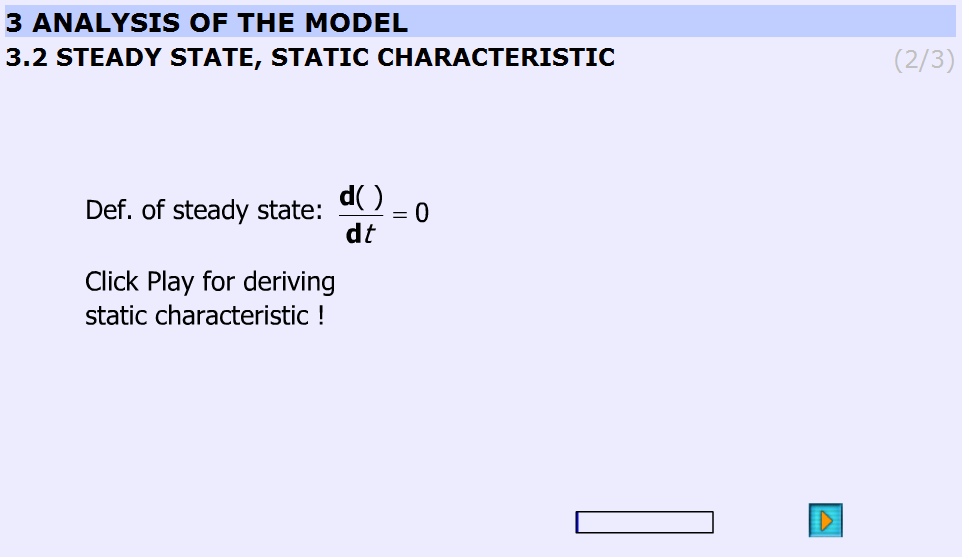
This subchapter derives the static characteristic equation of the DC motor in steady state operation. On that basis the next subchapter the static characteristics will show.
The derivation starts with the assumption:
|
|
(5.21) |
and ends with
|
( |
(5.22) |
|
|
(5.23) |
Static characteristic, working point
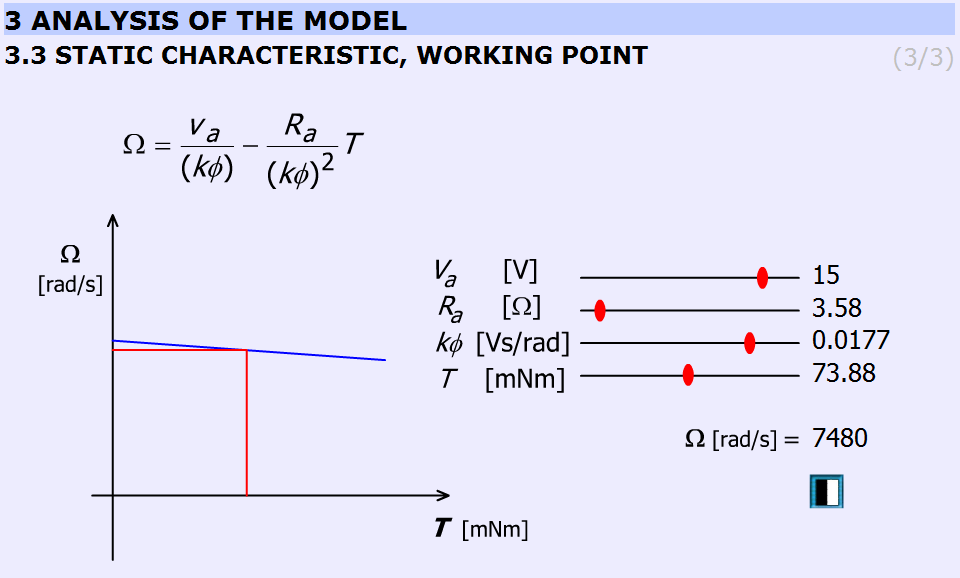
This subchapter explains the static characteristics and the working point.
The basic equation of the animation:
|
|
(5.24) |
(26)
The Simulink model of the Maxon motor used in the experiment is based on its rated values. They are the followings:
|
( |
( 5.25 ) |
|
( |
( 5.26 ) |
|
( |
( 5.27 ) |
|
( |
( 5.28 ) |
|
( |
( 5.29 ) |
|
( |
( 5.30 ) |
|
( |
( 5.31 ) |
|
( |
( 5.32 ) |
|
( |
( 5.33 ) |
|
( |
( 5.34 ) |
|
( |
( 5.35 ) |
|
( |
( 5.36 ) |
|
( |
( 5.37 ) |
The gear ratio: 33/1
The blue line is the static characteristic of the motor. The cross-section of the red line with the motor characteristics yields the working point. The rated values are indicated by vertical lines on the sliding bar.
5.9.4.1. Analysis of the transfer function
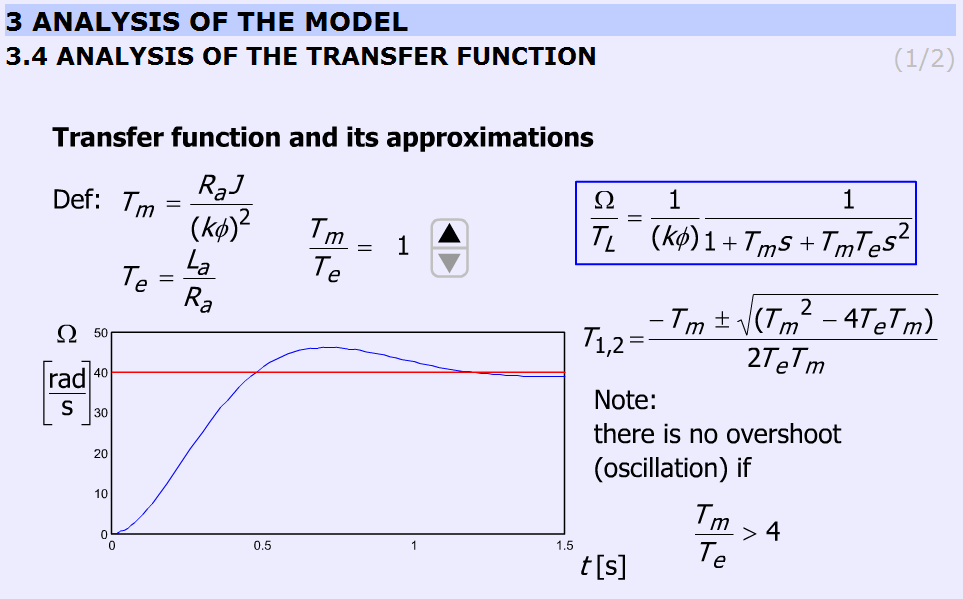
The transient response of the DC motor is discussed for step wise load torque change using different  ratio. The possibility of overshoot is explained. By changing
  , the response will also change. The time functions are calculated and uploaded. The ratio
  can be varied only in discrete predefined steps.
The equation to be solved:
|
( |
(5.38) |
The ratio can be varied in steps: 1; 2; 4; 8; 16; 33; 66.
The explanation is based on the roots of the characteristic equation:
|
( |
(5.39) |
Two real roots exist if  . The border case is:
|
( |
(5.40) |
than
When  conjugate complex roots are obtained.
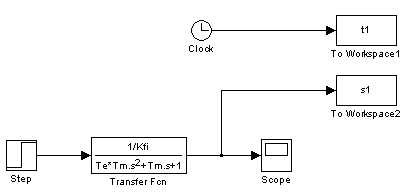
The simulation was carried out by using MatLab Simulink. The simulation setup can be seen in Figure 5-22.
Analysis of the transfer function
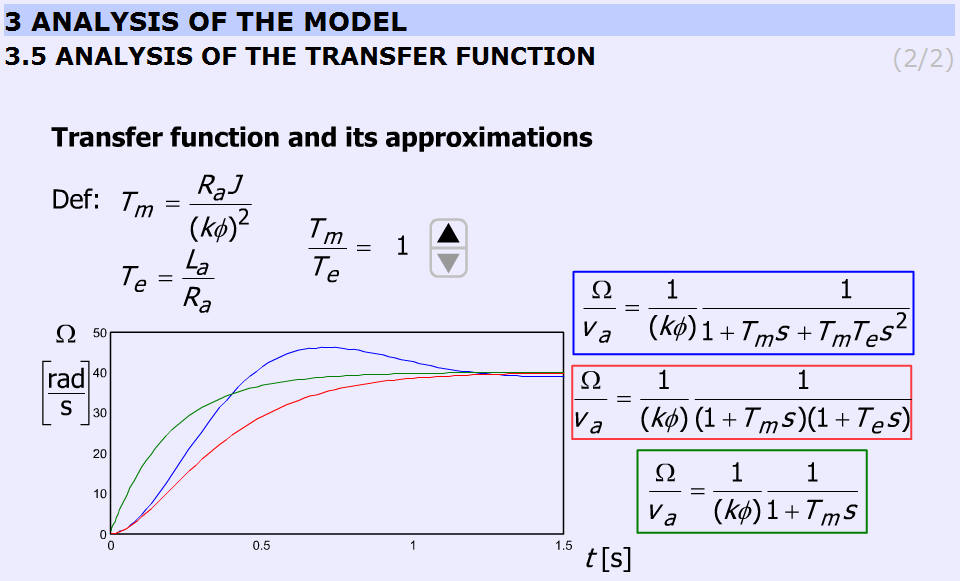
This subchapter explains the deviations among approximations taking into consideration the ratio  . The animation is built up exactly in the same way as in the previous chapter. The ratio
  can be varied in steps: 1; 2; 4; 8; 16; 33; 66.
Comparison with the previous chapter is also possible.
The accurate equation and its approximations:
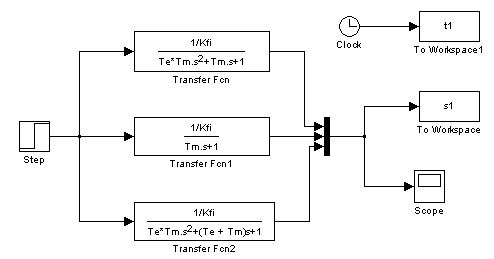
The simulation was carried out by using MatLab Simulink. The simulation setup can be seen in Figure 5-24.
5.9.5. Digital filter
After the introduction of the PC based measurement system, it is time for writing the first controller for a DC motor.
The time function of velocity is very noisy. A smooth curve can be obtained from the noisy signal by low pass filtering in the following way. Let the input of the system be the measured velocity,  , and the output of the system is the filtered velocity,
|
|
(5.46) |
Appling three serial connected lowpass filters with time constant  . The transfer function of the filter is
|
|
(5.47) |
After rearrangement
|
|
(5.48) |
Inverse Laplace-transformation
|
|
( 5.49 ) |
where Tc is the time period of the cut off frequency and the dot (  ) is short for derivate with respect to time. The state space equation of the filter is
|
|
( 5.50 ) |
The state space equation (5.50) can be rewrite in a Discrete time form.
|
|
(5.51) |
Where k is short for the kth sampling and the elements of the system matrix (ai and bi) can be calculated by the MATLAB function “c2d”, which is short for “continuous to discrete”.
[Ad, Bd] = c2d(A, B, tsample);
where tsample is the sampling period and Tc is the time constant of the filter.
Draft calculation of the filter cut off angular frequency
|
|
(5.54) |
The filter parameter
|
|
(5.55) |
A MATLAB script is created to calculate and print the filter parameters. It was necessary to check differences between filters. A third order Bessel filter and a fifth order Bessel filter are created.
.
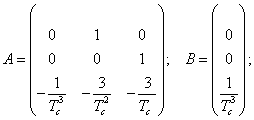
The MATLAB script for calculation of discrete time filter parameters :
Ts = 0.001;
Tc = 10*Ts;
A = [0, 1, 0;
0, 0, 1;
-1/Tc^3, -3/Tc^2, -3/Tc];
B = [0;0;1/Tc^3];
[Ad,Bd] = c2d(A,B,Ts);
for i = 1:3
for j = 1:3
disp(['float ad',num2str(i),num2str(j),' = ', num2str(Ad(i,j)),';']);
end
end
for i = 1:3
disp(['float bd',num2str(i),' = ', num2str(Bd(i)),';']);
end
Result
float ad11 = 0.99591;
float ad12 = 0.00095987;
float ad13 = 3.652e-007;
float ad21 = -11.3235;
float ad22 = 0.88778;
float ad23 = 0.00061567;
float ad31 = -19089.6748;
float ad32 = -193.6165;
float ad33 = 0.30752;
float bd1 = 0.0040906;
float bd2 = 11.3235;
float bd3 = 19089.6748;
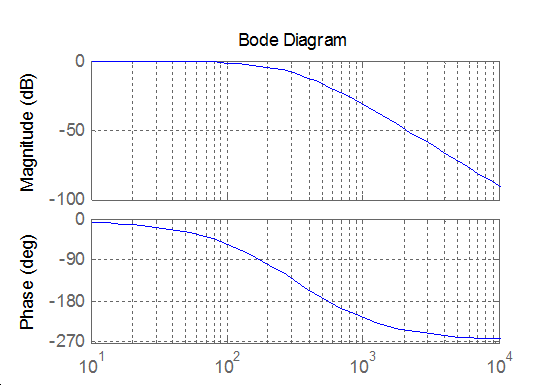
The transfer function of a third order Bessel filter:
|
|
(5.56) |
The MATLAB script for calculation of discrete time filter parameters:
Ts = 0.001;
Tc = 1/(2*pi*1/(2*Ts)/10);
A = [0, 1, 0;
     0, 0, 1;
     -15/Tc^3, -15/Tc^2, -6/Tc];

B = [0;0;15/Tc^3];

[Ad,Bd] = c2d(A,B,Ts);

for i = 1:3
    for j = 1:3
        disp(['float ad',num2str(i),num2str(j),' = ',num2str(Ad(i,j)),';'])
    end
end

for i = 1:3
    disp(['float bd',num2str(i),'  = ', num2str(Bd(i)),';']);
end
Result
float ad11 = 0.95193;
float ad12 = 0.00083371;
float ad13 = 2.6009e-007;
float ad21 = -120.9668;
float ad22 = 0.56688;
float ad23 = 0.00034345;
float ad31 = -159737.83;
float ad32 = -629.4281;
float ad33 = -0.080513;
float bd1  = 0.048071;
float bd2  = 120.9668;
float bd3  = 159737.83;
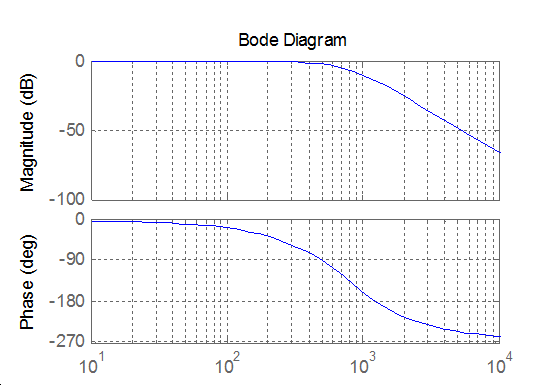
The transfer function of a fifth order Bessel filter
|
|
(5.57) |
The MATLAB script for calculation of discrete time filter parameters:
Ts = 0.001;
Tc = 1/(2*pi*1/(2*Ts)/10);
A = [0, 1, 0, 0, 0;
     0, 0, 1, 0, 0;
     0, 0, 0, 1, 0;
     0, 0, 0, 0, 1;
     -945/Tc^5, -945/Tc^4, -420/Tc^3, -105/Tc^2, -15/Tc];

B = [0;0;0;0;945/Tc^5];

[Ad,Bd] = c2d(A,B,Ts);

for i = 1:5
    for j = 1:5
        disp(['float ad',num2str(i),num2str(j),' = ',num2str(Ad(i,j)),';'])
    end
end

for i = 1:5
    disp(['float bd',num2str(i),'  = ', num2str(Bd(i)),';']);
end
Result
float ad11 = 2.3749;
float ad12 = 0.0060369;
float ad13 = 8.9952e-006;
float ad14 = 8.7509e-009;
float ad15 = -2.4834e-013;
float ad21 = -55.9541;
float ad22 = 0.80926;
float ad23 = 0.00070548;
float ad24 = 2.3492e-007;
float ad25 = 6.3994e-011;
float ad31 = -185062.4462;
float ad32 = -645.0082;
float ad33 = -0.024158;
float ad34 = 4.2341e-005;
float ad35 = 1.3387e-007;
float ad41 = -387151871.8085;
float ad42 = -1417349.3637;
float ad43 = -2388.3942;
float ad44 = -1.4113;
float ad45 = 7.4665e-005;
float ad51 = -215947384065.4345;
float ad52 = -1074421228.8149;
float ad53 = -2389749.1508;
float ad54 = -3161.8599;
float ad55 = -0.37582;
float bd1  = -1.3925e-005;
float bd2  = 0.00056689;
float bd3  = 1.8749;
float bd4  = 3922.0853;
float bd5  = 2186784.2468;
5.9.6. Description of the measurement
The CalculateController function is called every tick of the real-time clock.
#include <windows.h>
#include <stdio.h>
#include <rtapi.h>
#include <math.h>
#include <string.h>
#define PI 3.14159265358979323846
typedef struct
{
float Position;
float Velocity;
float Torque;
float StateVariable_5;
float StateVariable_6;
float StateVariable_7;
float StateVariable_8;
float StateVariable_9;
float StateVariable_10;
} NewControllerData;
NewControllerData CalculateController(
const float CurrentPosition,
const float OldPosition,
const float OldVelocity,
const float CurrentTime,
const float OldTime,
const float Old_StateVariable_5,
const float Old_StateVariable_6,
const float Old_StateVariable_7,
const float Old_StateVariable_8,
const float Old_StateVariable_9,
const float Old_StateVariable_10
)
{
NewControllerData ResultData; // result
//Declaration of your controller
// Position is saved automatically
ResultData.Position = CurrentPosition;
// Angular velocity is saved automatically
if (CurrentTime != 0.0f){
ResultData.Velocity = (1000.0f * (float)(CurrentPosition - OldPosition)/(float)(CurrentTime - OldTime));
}
else {
ResultData.Velocity = 0.0f;
}
//Calculation of your controller
return ResultData;
}
The new values of the variables and all calculations must be done inside this function. The state of the motor can be reached through the variables of the function:
ResultData.Position for the position;
ResultData.Velocity for the angular velocity of the motor;
ResultData.Time for the actual time.
For safety reasons, the input voltage of the motor cannot be set directly. The output of your controller program, which is the output signal of the D/A card is the reference current signal. You can consider it as a reference torque signal as well. This signal is defined as a variable named as
ResultData.Torque = …
The user should set the value at the end of “your controller program”. For example
ResultData.Torque = 1;
means that the torque of the shaft (after the gear) is set to 1 Nm. Since the output of the D/A card is voltage, the framework program calculates the proper voltage value from ResultData.Torque, which will be the output signal.
In this exercise Open Loop measurements will be performed with the DC motor. The user can select max 10 state variables to save in matlab form. Four of the 10 are fixed: time, position, angular velocity and the torque of the motor. If you want to save the state variable error you can do the following procedure.
Enter the name of the state variable vel_filt (filtered velocity) in to the fifth line like:
5. vel_filt;
Enter your variable declaration:
float vel_filt;
Enter the following in to your controller box
Vel_filt = (you have to calculate the value of the filtered velocity)
ResultData.StateVariable_5 = vel_filt;
After the measurement you can download the state variable vel_filt as well.
NOTE
The controller function is called in each sampling period. After finishing this function, all variables (except ResultData.Time, ResultData.Velocity, ResultData.Position ResultData.Torque and ResultData.StateVariable_5-10) are released (i.e. the values are lost). If you need a variable in the next sampling period you have to declare as static type variable. For example
static float vel_filt;
General steps needed:
-
Study the literature of DC motor overviewed in the current chapter entitled “Theoretical background for DC servo motor” below.
-
You can set the length of the measurement in millisecond (default value is 1000)
-
Based on measurements determine the transient responses and the steady-state characteristics of the DC servomotor.
As a help, the initialization of the two cards examined in Exercise 1-3 has already been performed for you. Only the above mentioned steps are needed for successful experiment.
5.9.7. Exercise tasks
Task 1.
In this exercise Open Loop measurements will be performed with the DC motor. Please, study the literature of DC motor overviewed in the current chapter below entitled “Theoretical background for DC servo motor”. In the first task, the electrical torque is set to
ResultData.Torque = 0.1;
ResultData.Torque = 0.5;
ResultData.Torque =1.0;
This way the step responses of various motor variables to different step change size in torque signals can be obtained. The result files, which can be downloaded at the end of the measurement, can be evaluated in Matlab. There is a program already written for this task. Running this program results in the shaft speed-time, voltage-time and position-time diagrams. These diagrams can also be saved in jpg format for further documentation.
Task 2. Digital filter
Task 3. Response of the motor to sinusoidal torque and compensation of the servo amplifier offset
The servo amplifier of has an offset voltage. This is the most obvious if we apply a sinusoidal voltage. In this case we expect the motor to have sinusoidal shaft speed and sinusoidal position change coming from the shaft speed.
5.10. Closed Loop Control Measurements – Motion control/ Exercise 5.
5.10.1. Theoretical background of Control theories
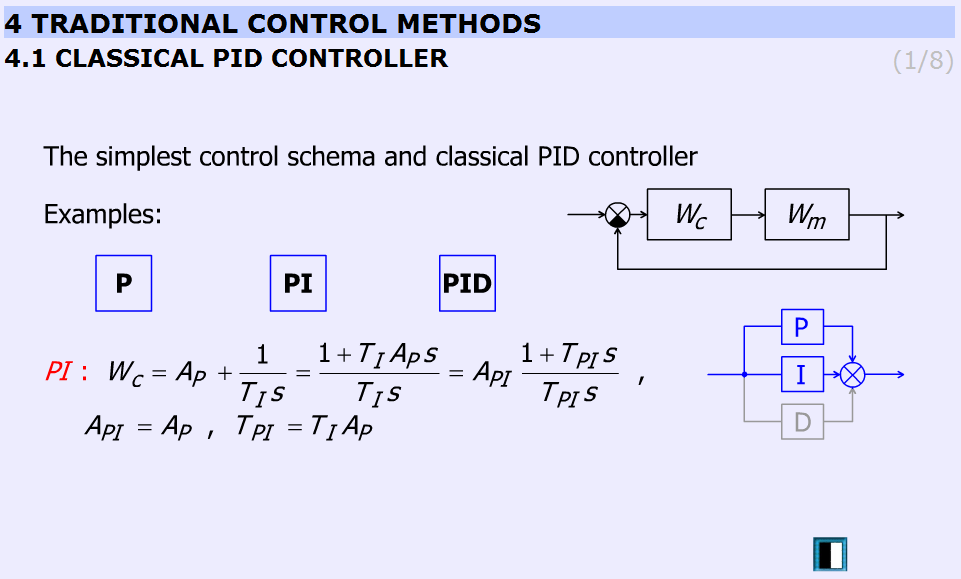
This animation presents the P, PI, PID controllers and the difference between them.
“P”:
|
( |
(5.58) |
“PI”:
“PID”:
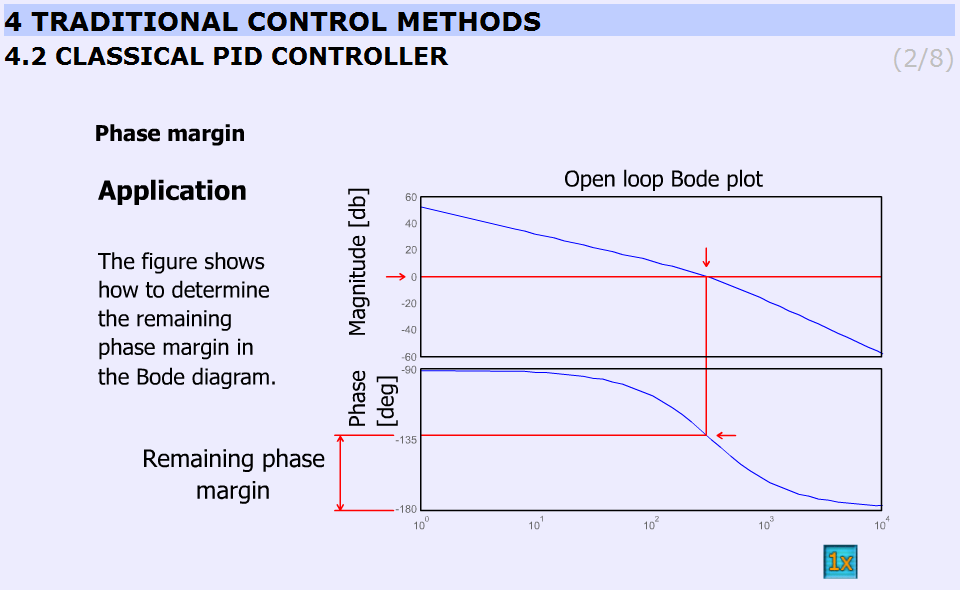
Figure 5-28. shows the application of the controller.
Animated explanation of the determination of the phase margin: On the Amplitude diagram on level 0, a red horizontal line appears. At the point, where the red line crosses the amplitude curve a vertical line goes down into the Phase diagram. The point, where this line crosses the phase curve, a horizontal line shows the actual phase. At the end the phase margin appears which can be calculated this way:
180o – actual phase = phase margin
This is indicated by the dimensional line on the phase axis.
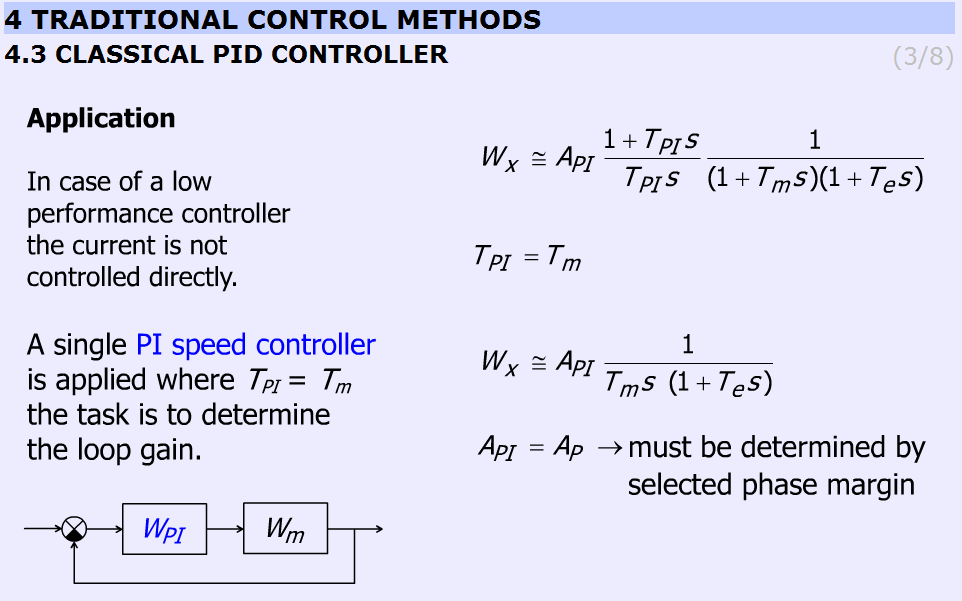
This slide explains the design applying PI controller. The transfer function of the controller and the motor with one approximation:
|
|
(5.63) |
By selecting  the transfer function becomes:
|
|
(5.64) |
Finally  and the task is to determine AP by choosing the phase margin.
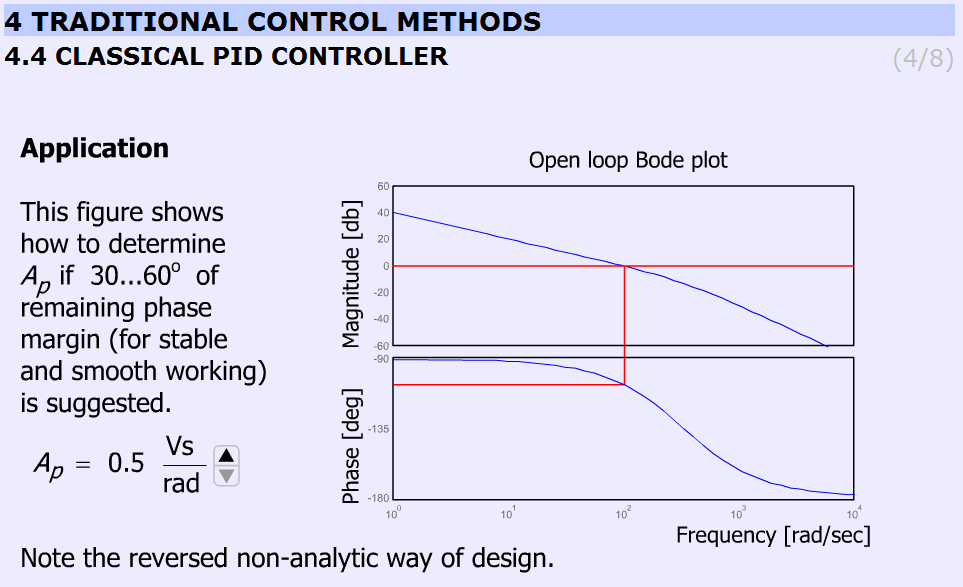
The animation shows the determination of Ap for 30...60o phase margin (for stable and smooth working) in a reversed non-analytical way, where the Bode plots let us to see the phase margin. The users can vary Ap between 0.5 and 3.5 and can check the effect of different gains on the phase margins. The animation uses the preliminary simulated results and graphs. Ap can be varied from 0.5 to 3.5 in 7 steps (0.5; 1.0; 1.5; 2.0; 2.5; 3.0; 3.5).
Parameters used in the simulation:
-
Tpi = 0.2 s;
-
Api = variable;
-
Kfi = 0.025 Vs/rad;
-
Te = 0.003 s;
-
Tm=Tpi.
MatLab commands:
g = tf([Api/Kfi],[Tpi*Te Tpi 0]);
bode(g);
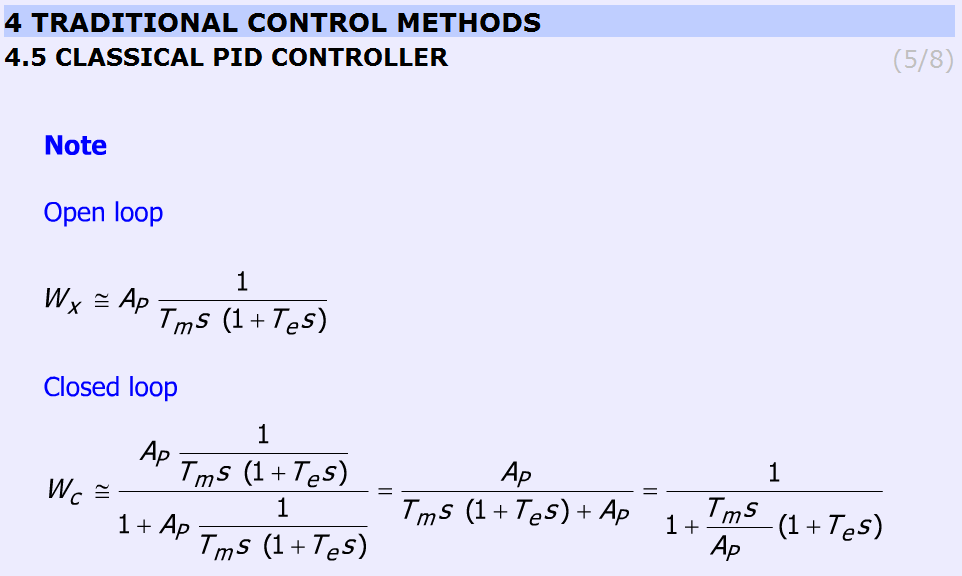
This slide helps to remember the open and the closed loop transfer function. The controller is PI ant TPI = Tm. The equations are as follows (without derivation):
-
Open loop
|
|
(5.65) |
-
Closed loop
|
|
(5.66) |
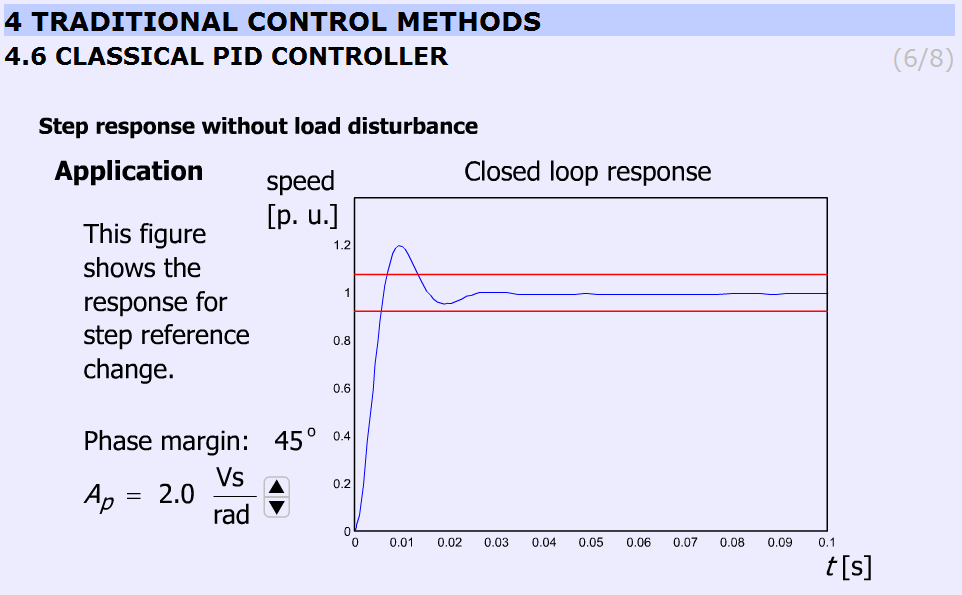
This animation presents the response for stepwise change in speed reference signal.
It should be noted that increasing Ap does not necessary result in overshoot. The animation uses the preliminary simulated results and graphs. Ap can be varied from 0.5 to 3.5 in 7 steps (0.5; 1.0; 1.5; 2.0; 2.5; 3.0; 3.5).
The simulation was carried out using MatLab Simulink. The simulation setup can be seen in Figure 5-33.
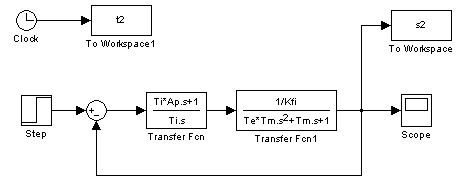
The arremgement of the motor and the PI controller in a feed-back loop can be seen in Figure 5-34.
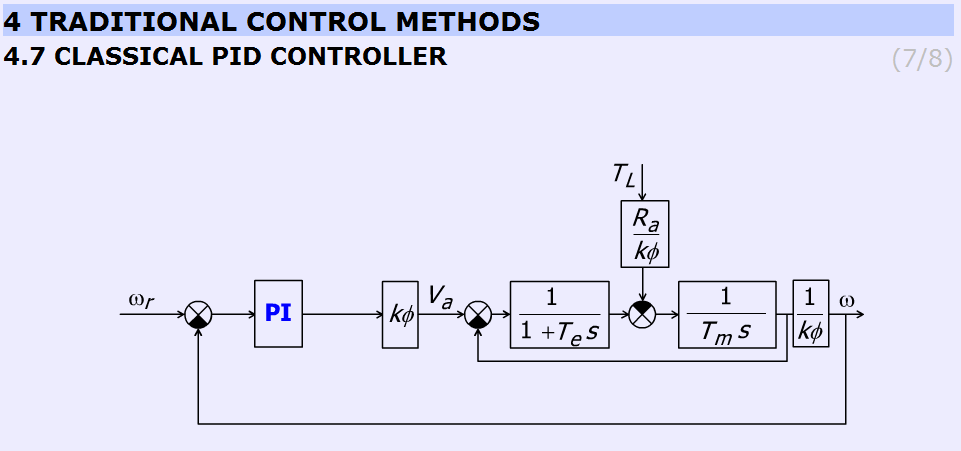
The user can observe that by increasing AP the overshot is getting higher.
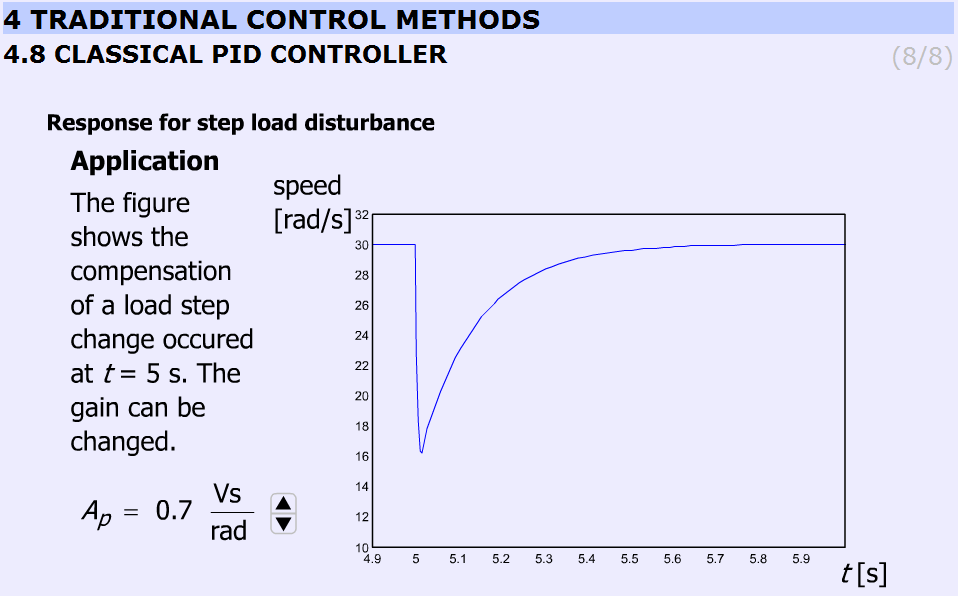
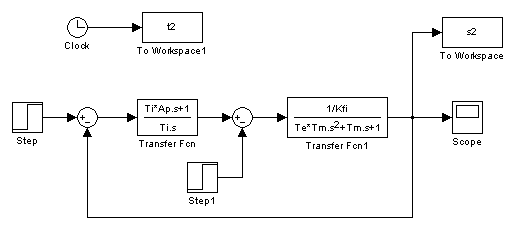
This slide (Figure 28) displays the effect of disturbance rejection. A stepwise load torque disturbance at t = 5s is at the input. The animation compares the speed of the controller at different Ap. Ap can be varied from 0.5 to 3.5 in 8 steps (0.5; 0.7; 1.0; 1.5; 2.0; 2.5; 3.0; 3.5). AP = 0.7 is included too because the difference between 0.5 and 1.0 is to significant.
5.10.2. Current controller
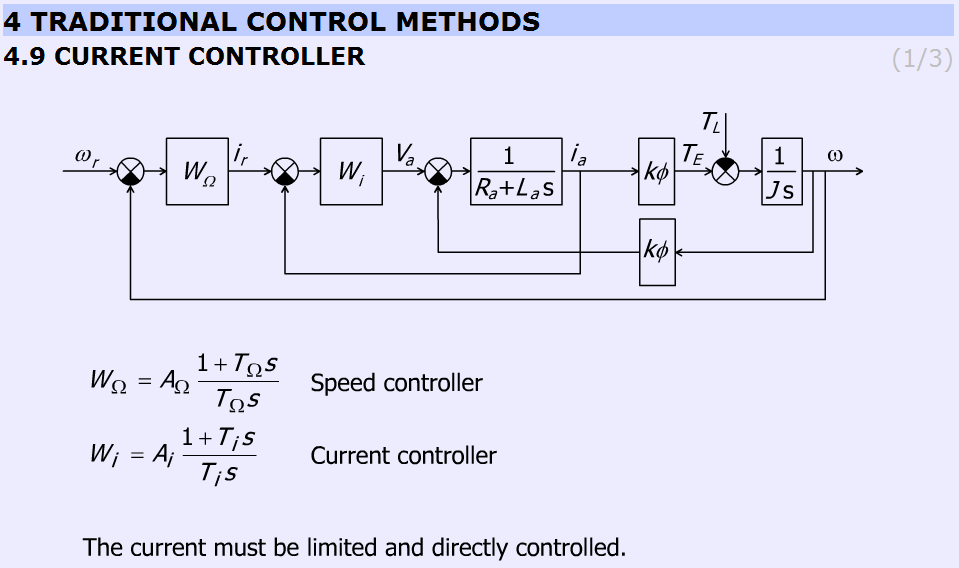
The subchapter entitled “current controller” explains the operation of the current controller briefly. The page contains a detailed block diagram of the motor and the controllers (speed and current) and the equations of the controllers
Speed controller:
|
|
(5.67) |
Current controller:
|
|
(5.68) |
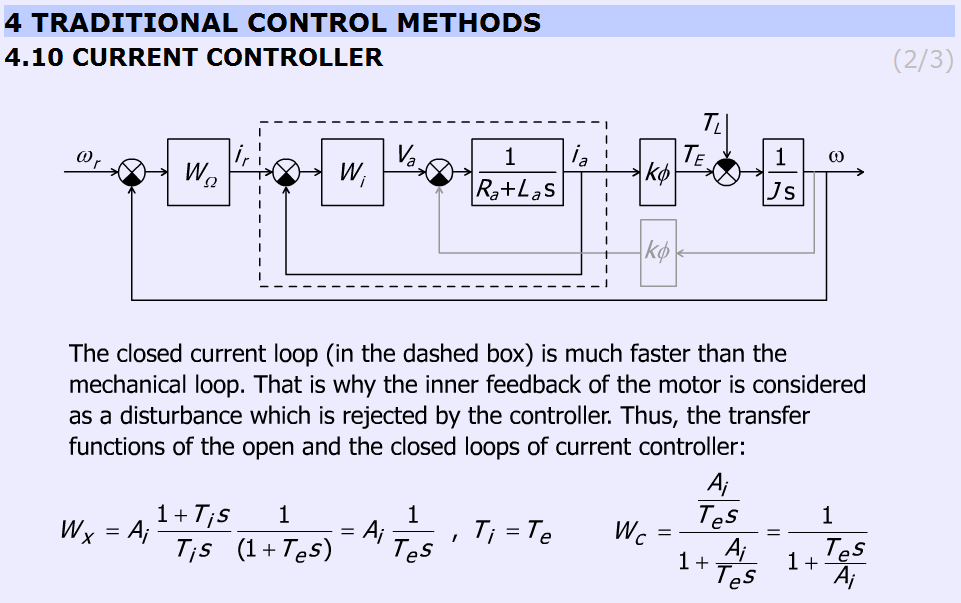
This slide explains why the internal feedback of the motor can be neglected. The figure helps to identify the more and less important elements. The internal feedback of the motor can be neglected because the current controller is much faster than the mechanical controller. Therefore, the internal feedback can be considered as a disturbance, which changes slowly, and this way the controller can eliminate the error caused by the inaccurate model of the DC motor.
The slide gives the equations to explain the operation of the controller.
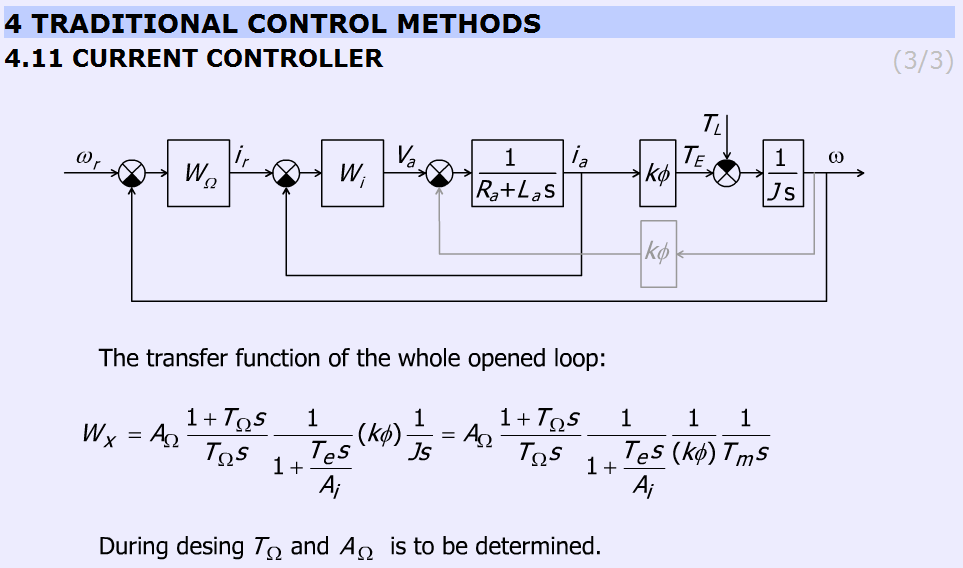
Figure 5-40 gives the open loop transfer function of the whole system.
|
|
(5.69) |
where ωe = ωr – ω.
5.10.3. Methods for selecting the parameter values for PID controller Ziegler Nichols method
The aim of this method is to select the parameters for PID controller by simple tests. There are several approaches, one of the simplest method is the Ziegler Nichols. This method is applicable for system with time delay. The methods developed by Ziegler and Nichols have been very popular in spite of the drawbacks. Practically all manufacturers of controller have used the rules with some modifications in recommendations for controller tuning. One reason for the popularity of the rules is that they are simple and easy to explain.
Tasks during tuning are as follows:
-
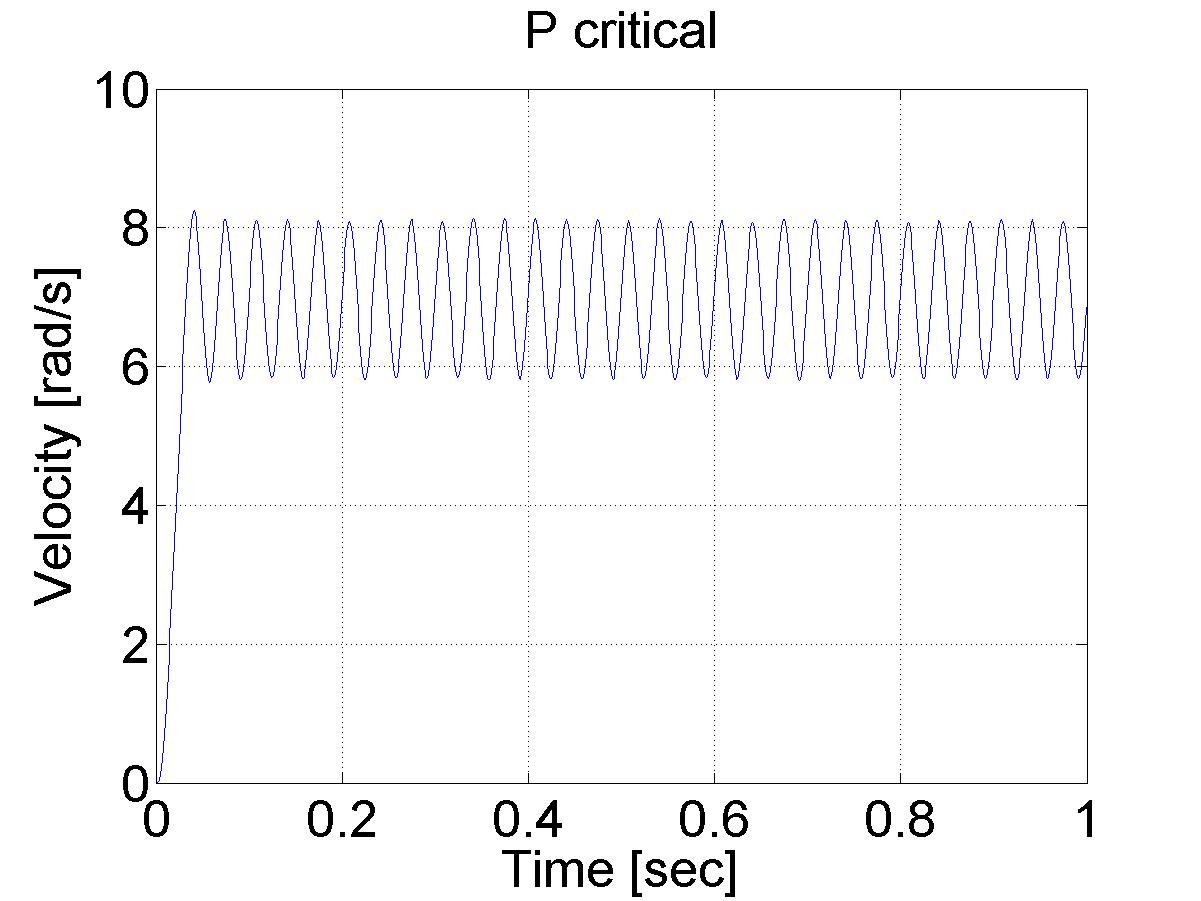
First, test whether the required proportional control gain is positive or negative. Turn the controller only to P mode, i.e. turn both the Integral and Derivative modes off. Set in open loop the input voltage (error signal) up (increase) a little by manual control to see whether the resulting steady-state value of the process output has also moved up (increased). If so, then the steady-state process gain is positive and the required Proportional control gain AP has to be positive as well, otherwise AP must be negative.
-
Change the controller gain AP up slowly (more positive if AP was decided to be positive in step 1, otherwise more negative if AP was found to be negative in step 1) and observe the output response. Note that this requires changing AP in step increments and waiting for a steady state in the output, before another change in AP is implemented.
-
Mark this critical value of AP as AU, the ultimate gain when a value of AP results in a sustained periodic oscillation in the output (or close to it), Also, measure the period of oscillation TU, (Fig. 34). TU is referred to as the ultimate period.
-
Using the values of the ultimate gain, AU, and the ultimate period, TU Ziegler and Nichols method prescribes the following values for AP, TI and TD, depending on the type of the desired controller:
Table : Zigler- Nichols tuning chart
|
AP |
TI |
TD |
|
|
P control |
AU/2 |
||
|
PI control |
AU/2.2 |
TU/1.2 |
|
|
PID control |
AU/1.7 |
TU/2 |
TU/8 |
Various controller types are studied next.
In this exercise first P, after PI and at the end PID speed controller is set-up for the DC motor.
Steps:
-
Study the literature of control theory overviewed in the below chapter entitled “Theoretical background of control theories”.
-
Set up controller (P, PI, PID, etc.).
Exercise tasks
After studying the basics of P, PI and PID speed control of DC motors, the user can build the controllers for the exercise.
Task 1.
Determine the values for your P, PI and PID controller. This can be done according to Ziegler-Nichols method (see below), by changing the P value until the system starts oscillating. This way the values can be calculated and the controllers can be programmed (please, use low pass filter for the velocity).
Task 2.
Compare the results of the P, and PI controllers for a reference shaft speed Ω = 4 rad/s.
Task 3.
Task 3 is an extension of Task 2, with the difference that in this case we set the reference shaft speed Ω = 4 rad/s at t = 0 s, change it to Ω = 2 rad/s at t = 2 s and again change it Ω = 6 rad/s at t = 4 s.
Task 4.
Compare the P, and PI controllers for disturbance rejection. The disturbance will be applied at t = 0.5 s, as a negative torque T_load= -0.5, which is subtracted from the output voltage calculated by the controller.
ResultData.Torque = (please write here your controller)
ResultData.Torque = ResultData.Torque + T_load; /* this is the line for virtual load*/
Task 5.
Execute the same tasks with open loop and compare the results with those of P, and PI controllers.
The result files, which can be downloaded at the end of the measurement, can be evaluated in Matlab. There is a program already written for this task, which draws the shaft speed-time, voltage-time and position-time diagrams. These diagrams can be saved in jpg formats for further documentation.
Task 6.
Fault tolerance of PI controller (anti-windup PI controller).
Simulate a fault when the motor is blocked or the power electronic unit has a failure and the torque is 0 while the PI controller is operating. The integral term is increasing. After the failure the integral term must be reduced (the integral term of positive error must be compensated by an integral term of negative error).
First tune a PI controller (set the Measurement length to 1000 ms), then add the following line to the controller:
if ( CurrentTime < 0.3*1e3) {ResultData.Torque = 0.0;}
Set different limits for the integral term of PI controller and compare the performances.
Task 7.
Design a sliding mode controller for the position of the motor.
The two main steps of the design of a sliding mode controller are
-
selection of a proper sliding surface,
-
selection of a proper control law.
The constant reference position is set to
αref= 10 rad.
The position and speed error are defined as
αe= αref – αmotor
Ωe= 0-Ωmotor .
The sliding surface is selected as
σ=αe+λΩe .
The control law is selected as
torque=0.1 sign σ.
Of course, you have to use C code for the algorithm above. For more detailed information and even newer control theories visit the animation site:
http://dind.mogi.bme.hu/animation/
